DIGITAL CULTURETHE LAB / DIKULT105

THE LAB / DIKULT105 · AUTUMN 2026

Enter the lab

Eight Fridays. One final work. Collect all 24 stars.

  • Open your project
  • Run the experiment
  • Save and finish

YOUR LAB RANK

Lab intern

0 / 24 stars 0 / 8 labs complete

New here, or missed a Friday? Start at Lab 1, step 1. Every lab builds on the one before, and every lab is open.

▶ Start experiment 01

A workshop, not a speedrun. Bring your own project: we choose one manageable next step together.

Course timeline + computing history

THE FINAL WEEKS

Road to week 50

  1. WEEK 43Lab 423 Oct · rules and rooms
  2. WEEK 44Lab 530 Oct · project lab, optional library visit. Video lecture counts as attendance
  3. WEEK 45Lab 66 Nov · future lab. Maybe the last obligatory chance
  4. WEEK 46Lab 713 Nov · feedback clinic
  5. WEEK 47Lab 820 Nov · ship it: link and video
  6. WEEK 48Buildno classes
  7. WEEK 49Writeno classes
  8. WEEK 50Insperahand in. Exact deadline in Inspera
Open the Final quest →

LAB LEGENDS

  • 1822Charles Babbage publishes his plan for a Difference Engine.
  • 1834Babbage conceives the Analytical Engine, a proposed programmable mechanical machine.
  • 1843Ada Lovelace publishes Note G, an algorithm for calculating Bernoulli numbers on the proposed Analytical Engine.
  • 1843Lovelace discusses how the engine might compose music if musical relationships could be expressed as rules.
  • 1936Alan Turing imagines a universal machine reading an endless tape.
  • 1950Turing asks: “Can machines think?”
  • TodayYou open VS Code and continue the story.

LAB 01 / FRIDAY 2 OCTOBER 2026

A place becomes a webpage

How can a detail from your own life shape a digital work?

Morning · 08:15-10:00 · 105 minutes

Today's timetable · two breaks: 09:00-09:10 and 09:40-09:45 (morning), 15:00-15:10 and 15:40-15:45 (afternoon)
  1. 08:15-08:200-5 min

    Welcome and choose a small goal

    Open your own project.

    Details & help

    Do: Open your own project. Choose one thing you would like to understand or move forward today.

  2. 08:20-08:305-15 min

    One useful example

    Watch for the part that could help your project.

    Details & help

    Do: Watch for the part that could help your project. You do not need to rebuild your work in another tool.

  3. 08:30-08:4015-25 min

    Plan and settle in

    Write a small goal and open the relevant files.

    Details & help

    Do: Write a small goal and open the relevant files. Ask for clarification or begin working when ready.

  4. 08:40-09:0025-45 min

    Own-project time: A page, image or small interaction in your own project

    Choose one change in your existing project: structure, readability, a reveal or the way your own material appears.

    Details & help

    Do: Choose one change in your existing project: structure, readability, a reveal or the way your own material appears. If you need a starting point, use the HTML/CSS example. Work at your own pace.

  5. 09:00-09:1045-55 min

    Break: step away

    Save and take a real break.

    Details & help

    Do: Save and take a real break. Stretch, get water or leave the screen.

  6. 09:10-09:4055-85 min

    Own-project time: continue and test

    Continue your project.

    Details & help

    Do: Continue your project. Use the HTML/CSS guide only where it helps. In the final five minutes, ask a partner to try the change and make one useful repair.

  7. 09:40-09:4585-90 min

    Short break: reset

    Save and take a real break.

    Details & help

    Do: Save and take a real break. Stretch, get water or leave the screen.

  8. 09:45-09:5590-100 min

    Save and test your work

    Save your project files. Try the main interaction once more and check that the saved version works.

    Details & help

    Do: Save your work and make a short note about what you tried and what you want to do next. Note any blocker accurately.

  9. 09:55-10:00100-105 min

    One next step

    Write one decision or discovery and one manageable next step.

    Details & help

    Do: Write one decision or discovery and one manageable next step. Keep your files and notes.

Step 1 of 3 · Check in

Open your project, then step into today’s experiment.

Enter the project laboratory →

01PRACTICE

Practice: CSS & colour studio

Learn the technique hands-on, with instant feedback. Optional, but the fastest way in.

TECHNIQUE 01 / CSS & COLOUR

Colour is never neutral.
Style your place.

Before anyone reads a word, your page has already said something. In this studio you find where your code lives, read one CSS rule, and choose a colour on purpose.

  1. Where code lives ≈ 3 min
  2. Read a rule ≈ 3 min
  3. Why colour speaks ≈ 4 min
  4. Colour studio ≈ 5 min
  5. CSS Reactor ≈ 10 min
  6. Do it in VS Code ≈ 10 min
  7. Say why ≈ 5 min

01 / WHERE YOUR CODE LIVES

Open your folder in VS Code.

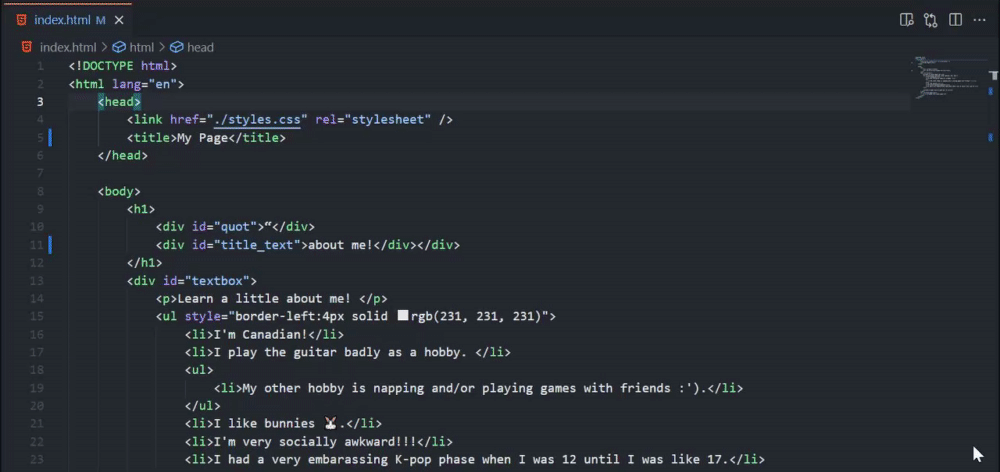
You write CSS in Visual Studio Code (VS Code), a free code editor. Your project is a folder, not a single file. Always open the whole folder, so VS Code and Live Preview can find every file.

  1. Did the setup guide? Use that folder, for example my-future-world. Create a new file called style.css next to index.html, copy in the starter CSS, and paste <link rel="stylesheet" href="style.css"> inside the <head> of index.html. Starting fresh? Download the Lab 1 starter and unzip it: the folder my-place-page already has both files.
  2. In VS Code choose File → Open Folder… and select your project folder.
  3. In the Explorer on the left, click style.css. This is where you will work today.
  4. Open index.html, right-click in the editor and choose Show Preview (Live Preview). Keep the preview beside your code.

First time on this computer? Follow the setup guide to install VS Code and Live Preview, then come back.

style.css · my-place-page · Visual Studio Code

EXPLORER

▾ MY-PLACE-PAGE

<> index.html

# style.css

1body {
2  max-width: 44rem;
3  font-family: system-ui, sans-serif;
4  color: #18242d;
5  background: #f3f0e8;
6}
Your starter style.css (shortened). Lines 4 and 5 decide the mood of the whole page.

index.html

Says what the page is: the heading, your sentence, the hidden question.

# style.css

Says how it feels: colour, type, space.

The two files are joined by one line in the <head> of index.html: <link rel="stylesheet" href="style.css">. Think of it as the cable between them. If the file name or folder is wrong, the page loses its style.

02 / READ ONE RULE

Every CSS rule has the same shape.

This is a real line from your starter. Click each part to see what it does.

:

Selector: body chooses which HTML to style. body means the whole visible page. h1 would mean only your heading, p every paragraph.

Braces { } hold all the instructions for that selector.

Property is what you change: color is the text colour, background is the colour behind it.

Value is how it changes. #f3f0e8 is a warm off-white.

Semicolon ; ends one instruction. Forgetting it is the most common reason CSS silently stops working.

HOW TO READ A HEX CODE

#f3f0e8

A hex code is three pairs: red, green, blue. Each pair goes from 00 (none) to ff (full). #ff0000 is pure red, #000000 black, #ffffff white. #f3f0e8 has almost full red, green and blue, with a little less blue, which is why it feels warm, like paper.

LEARN IT PROPERLY ON W3SCHOOLSCSS syntax ↗Selectors ↗Hex colours ↗

03 / WHY COLOUR SPEAKS

On screens, colour is a language we already know.

You have spent years learning what interface colours mean, without anyone teaching you. Designers use that shared knowledge on purpose. So can you.

Red badge

Notifications, errors, live. Red asks for your attention now. Apps use it because it pulls you back in: colour as part of the attention economy.

Link blue

Early web browsers made links blue, and we still read blue as “click me”. Banks and social platforms lean on blue to look calm and trustworthy.

Dark mode

Night, privacy, a phone in bed. Dark screens feel intimate and late. They can also feel like a terminal, a hacker, a secret.

Soft pastel

The “aesthetic” feed. Pastels signal a mood, an identity and a community. Choosing a palette online is often choosing who you belong with.

Meaning is cultural, not universal. White can mean a wedding in one place and mourning in another. Green can mean nature, money, “go” or a political party. Ask: who is reading this, and what have they learned?

Contrast decides who is included. If text and background are too close, people with low vision, tired eyes or a bright screen outside cannot read your page. Aim for a contrast ratio of at least 4.5 : 1, and never let colour be the only way something is explained.

What should your place feel like before anyone reads a word?

04 / COLOUR STUDIO

Try colours on your page before you touch the code.

This preview uses the text from your starter. Choose a mood or pick your own colours. The CSS below updates as you go, ready to paste.

my-place-page / index.html

A place I know

I notice the sound of rain at the bus stop.

▸ What if this changes in the future?

CONTRAST

14.9 : 1 · Readable

4.5 : 1 or more is readable for normal text.

# style.css / paste inside body { }

  color: #18242d;
  background: #f3f0e8;

05 / CSS REACTOR

Write real CSS. Power up the reactor.

This is the actual style.css of your Lab 1 page. Type in the editor and the page on the right changes as you type. Light all four missions to reach full power.

REACTOR / STYLE.CSS

POWER 0%

  1. Power onChange the page background to a new colour.
  2. Give the heading a voiceAdd an h1 rule with its own colour.
  3. Readable for everyoneKeep text and background at 4.5 : 1 or more.
  4. Break a convention on purposeChange a font, the letter-spacing or the capitals.

# style.css

LIVE PREVIEW / index.html

Enable JavaScript to power the reactor. You can still copy the code above into VS Code.

06 / DO IT IN VS CODE

Now make the change for real.

  1. Go back to style.css in VS Code.
  2. Inside body { }, replace the value after color: and after background: with your two hex codes. Keep the # and the ;.
  3. Below the body rule, write your first rule of your own. Give only the heading its own colour:
    h1 {
      color: #b3122e;
    }
  4. Save with Ctrl + S (Mac: Cmd + S). Live Preview updates on its own.
  5. Before you look at the preview, say out loud what you expect to change. Then check.
Nothing changed?
  • Not saved. A dot on the file tab in VS Code means unsaved changes. Press Ctrl/Cmd + S.
  • Missing # or wrong length. A hex code is # plus exactly six characters: #b3122e.
  • Missing ; or }. One missing character can stop the rest of the file. VS Code underlines it in red.
  • Wrong folder. style.css must sit next to index.html, and the <link> line must say href="style.css".

07 / SAY WHY

A colour choice is a claim. Write it down.

Optional stretch: make a second version of the same page with the opposite mood. Ask a classmate what each version tells them, before you explain anything.

02REQUIRED

Your project

YOUR IDEA / YOUR DECISION

Choose what your project lets someone do.

Start with a place, feeling or question you care about.

  1. Choose one interaction.
  2. Build it. Read any AI code you keep.
  3. Test it twice.
EXPERIMENT 01Ready when you are

YOUR WORKBENCH

Make a place

Turn an observation into a webpage.

What detail from a place you know could become a colour, a sentence or a layout?

Open the setup guide: VS Code + Live Preview ↗

Already working on something? Apply these steps to your own project. No AI required.

Your experiment checklist

Try these practical steps in your project. Check them when you have tested the result.

Experiment 1 milestones
0 / 3 milestones

Enable JavaScript to save a personal checklist on this device. The guides and schedule work without it.

Experiment not behaving? Open the help drawer.

Start small: describe what you expected, then what actually happened. Change one thing and try again.

Ask for help: “Can we look at this together?” Nobody is expected to know everything.

Need a pause?Take it. Your progress stays here when storage is available. Scheduled breaks: 09:00-09:10 and 09:40-09:45 (morning), or 15:00-15:10 and 15:40-15:45 (afternoon).

03WHEN YOU NEED IT

⏱ Whenever you need it

Examples and guides

Step-by-step guides and official screenshots. Open it when you need it.

Open practical guides and official screenshots
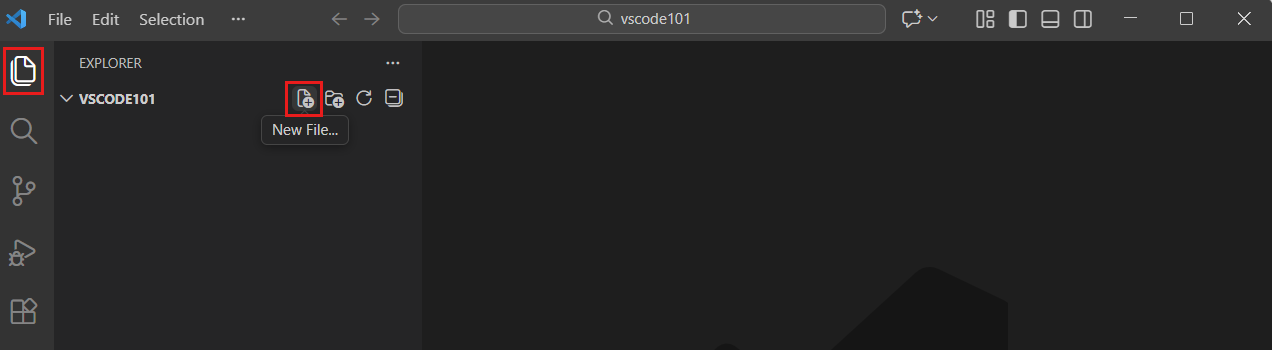
Microsoft: the New File control in VS Code Explorer
Microsoft: the New File control in VS Code Explorer. Image from the linked official source. Tool screenshots show example projects; the library photo shows the actual entrance. Official source ↗. The linked guides explain the exact steps.
Next level: save & reflect →

TURING’S LAB / LAB 1 MACHINE

Card engine

Instructions turn an idea into an action.

Enter this machine →

Optional experiment, 3-5 minutes within project time. All machines are open.

LAST STOP / LAB 01

Keep your work. Make a note.

  1. Save your project files. Keep a copy somewhere you can find again.

Your experiment checklist and notes are saved in this browser when storage is available.

Return to the lab map ↑

Confirm your saved work below, then launch your finish screen.

Before you mark this quest complete
Save your work

What you can take from this lab

Leave with: Visible, saved progress on your own project, using today’s technique where relevant; the starter exercise is available for anyone who needs it.

Connect to the course: Digital Creativity: creative practice develops through materials, tools, precedents and other people. Connect a deliberate design choice to the experience you want to create.
LAB 02 / FRIDAY 9 OCTOBER 2026

A choice becomes a consequence

What does an audience's action change, and why does that matter?

Morning · 08:15-10:00 · 105 minutes

Today's timetable · two breaks: 09:00-09:10 and 09:40-09:45 (morning), 15:00-15:10 and 15:40-15:45 (afternoon)
  1. 08:15-08:200-5 min

    Welcome and choose a small goal

    Open your own project.

    Details & help

    Do: Open your own project. Choose one thing you would like to understand or move forward today.

  2. 08:20-08:305-15 min

    One useful example

    Watch for the part that could help your project.

    Details & help

    Do: Watch for the part that could help your project. You do not need to rebuild your work in another tool.

  3. 08:30-08:4015-25 min

    Plan and settle in

    Write a small goal and open the relevant files.

    Details & help

    Do: Write a small goal and open the relevant files. Ask for clarification or begin working when ready.

  4. 08:40-09:0025-45 min

    Own-project time: One meaningful action in your own project

    Choose a button, choice, reveal or state change your project needs.

    Details & help

    Do: Choose a button, choice, reveal or state change your project needs. Use the JavaScript example if relevant; if your project uses Construct, work on the equivalent event. Choose one achievable change.

  5. 09:00-09:1045-55 min

    Break: step away

    Save and take a real break.

    Details & help

    Do: Save and take a real break. Stretch, get water or leave the screen.

  6. 09:10-09:4055-85 min

    Own-project time: continue and test

    Continue that same change.

    Details & help

    Do: Continue that same change. Ask for an explanation or debugging help when needed. Spend the final five minutes testing with a partner and record what happened.

  7. 09:40-09:4585-90 min

    Short break: reset

    Save and take a real break.

    Details & help

    Do: Save and take a real break. Stretch, get water or leave the screen.

  8. 09:45-09:5590-100 min

    Save and test your work

    Save your project files. Try the main interaction once more and check that the saved version works.

    Details & help

    Do: Save your work and make a short note about what you tried and what you want to do next. Note any blocker accurately.

  9. 09:55-10:00100-105 min

    One next step

    Write one decision or discovery and one manageable next step.

    Details & help

    Do: Write one decision or discovery and one manageable next step. Keep your files and notes.

Step 1 of 3 · Check in

Open your project, then step into today’s experiment.

Enter the project laboratory →

01PRACTICE

JavaScript first steps in VS Code

Open your own page. Connect a JavaScript file. Make one click change one sentence, then explain and test your change.

START HERE / YOUR LAB 1 PAGE

One button. One visible change.

HTML gives you the paragraph and button. CSS gives them an appearance. JavaScript tells the button what to do.

  1. Open your page in VS Code and add a paragraph and button.
  2. Connect story.js to index.html.
  3. Make the click change the paragraph's words.
  4. Use your own words, then test the first and second clicks.
JavaScript first steps in VS Code

No AI required. A second click can repeat the same action. Making it reversible is an optional next challenge.

02REQUIRED

Your project

YOUR IDEA / YOUR DECISION

Choose what your project lets someone do.

Start with a place, feeling or question you care about.

  1. Choose one response that matters to your project.
  2. Build it and read the JavaScript you keep.
  3. Test the first and second clicks.
EXPERIMENT 02Ready when you are

YOUR WORKBENCH

Make a response

Give your project a cause and an effect.

What should a visitor be able to change, reveal or interrupt?

JavaScript first steps in VS Code

Already working on something? Apply these steps to your own project. No AI required.

Your experiment checklist

Try these practical steps in your project. Check them when you have tested the result.

Experiment 2 milestones
0 / 3 milestones

Enable JavaScript to save a personal checklist on this device. The guides and schedule work without it.

Experiment not behaving? Open the help drawer.

Start small: describe what you expected, then what actually happened. Change one thing and try again.

Ask for help: “Can we look at this together?” Nobody is expected to know everything.

Need a pause?Take it. Your progress stays here when storage is available. Scheduled breaks: 09:00-09:10 and 09:40-09:45 (morning), or 15:00-15:10 and 15:40-15:45 (afternoon).

Optional: practice the mechanism in the Signal Control Room

This console adds prediction and a reversible click. Use it after your first button works in VS Code, or return later.

TECHNIQUE 02 / EVENTS AND STATE

Make a click change the page.

New to JavaScript? Open the step-by-step tutorial →

HTML puts the button on the page. CSS changes how it looks. JavaScript tells it what to do when someone clicks.

Start with the page you saved at the end of Lab 1. Use this training console to learn the mechanism, then carry it into that page. Allow 20 minutes for all six checkpoints; you can return to your saved work. Already understand it? Go to my project →

SIGNAL / STORY.JS

POWER 0%

  1. 1. Understand it≈ 3 minRun four lines, then click the preview button.
  2. 2. Change it≈ 3 minWrite a future for a place you know.
  3. 3. Make it reversible≈ 4 minMake a second click change the words back.

STAGE 1 / UNDERSTAND THE CLICK

Connect a button to a paragraph.

The preview has a paragraph named story and a button named future. Run one line at a time to connect them.

See the HTML these lines refer to
<p id="story">I hear rain at the bus stop.</p>
<button id="future">See a possible future</button>

An id gives an element a name. In a selector, #story means "the element with id story".

  1. 1. Store the new sentence

    const futureText = "In 2040, this stop plays memories left by strangers.";

    const creates a named value. Here, futureText holds the sentence we will show.

  2. 2. Find the paragraph

    const story = document.querySelector("#story");

    document is this webpage. querySelector finds an element. This line finds the paragraph and gives us a reference called story.

  3. 3. Find the button

    const button = document.querySelector("#future");

    The same method finds the button. Neither of these lines changes the page yet.

  4. 4. Connect the click to the change

    button.addEventListener("click", () => { story.textContent = futureText; });

    addEventListener waits for a click. The code inside { } runs after that click. textContent replaces the paragraph's words.

index.html

A place I know

I hear rain at the bus stop.

Enable JavaScript to run the boot sequence.

STAGE 2 / WRITE YOUR OWN FUTURE

Change one sentence. Keep the mechanism.

Write your sentence below and put it into line 1. Notice the quotation marks: they tell JavaScript this is text. Then press Run my code; the lab runs your code and clicks the button for you.

story.js

AFTER ONE CLICKRun your code to see the page.

> console ready

STAGE 3 / THE SECOND-CLICK CHALLENGE

Make the second click change the words back.

Right now every click sets the same sentence. Real interfaces remember their state: is the future showing or not? Edit the same code below so a second click brings back “I hear rain at the bus stop.”, then test it.

  1. let showingFuture = false; starts with "no". let lets this value change.
  2. showingFuture = !showingFuture; flips no to yes, then yes to no.
  3. if chooses which sentence to show. Future when yes; original when no.

You can write it yourself, or load the example and inspect it. Then press Test both clicks. Loading code does not complete the task.

OPTIONAL / AI AFTER YOUR FIRST RESPONSE

Vibecoding in your project

Tell AI what you want to build or change in your VS Code project. Try the result and ask for the next change. Use text, or voice input if your tool supports it.

Try the AI exercise →

04WHEN YOU NEED IT

⏱ Whenever you need it

Examples and guides

Step-by-step guides and official screenshots. Open it when you need it.

Open practical guides and official screenshots
Microsoft: opening Live Preview
Microsoft: opening Live Preview. Image from the linked official source. Tool screenshots show example projects; the library photo shows the actual entrance. Official source ↗. The linked guides explain the exact steps.
Next level: save & reflect →

Another challenge? Turing’s culture laboratory · optional 8 minutes

Need an idea or a technique for your project? Pick one experiment: compare machine vision, change a story through clicks, or connect your interests to a design decision. Return to your own work whenever you are ready. Use up to 8 minutes of project time. Keep your break and the final save-and-reflect step.

Enter Turing’s laboratory →

TURING’S LAB / LAB 2 MACHINE

Tape machine

Rules and state make the second click work.

Enter this machine →

Optional experiment, 3-5 minutes within project time. All machines are open.

LAST STOP / LAB 02

Keep your work. Make a note.

  1. Save your project files. Keep a copy somewhere you can find again.

Your experiment checklist and notes are saved in this browser when storage is available.

Return to the lab map ↑

Confirm your saved work below, then launch your finish screen.

Before you mark this quest complete
Save your work

What you can take from this lab

Leave with: Visible, saved progress on your own project, using today’s technique where relevant; the starter exercise is available for anyone who needs it.

Connect to the course: Creative Coding: rules and state changes can express ideas. AI literacy: distinguish an explanation from evidence that a program actually behaves as claimed.

LAB 03 / FRIDAY 16 OCTOBER 2026

Construct 1: first contact

What can a map reveal about a place when someone taps it?

Morning · 08:15-10:00 · 105 minutes

Today's timetable · two breaks: 09:00-09:10 and 09:40-09:45 (morning), 15:00-15:10 and 15:40-15:45 (afternoon)
  1. 08:15-08:200-5 min

    Arrive: open Construct

    Open editor.construct.net in Chrome or Edge. Sign in and activate Pro if you can.

    Details & help

    Do: Open editor.construct.net in Chrome or Edge. Sign in and activate Pro if you can. Open your own project if you have one. No account yet? Work as a guest today: 25 events is plenty.

  2. 08:20-08:305-15 min

    Together: Construct in ten minutes

    Watch on the big screen and copy each click: Part 1, scenes 1 and 2.

    Details & help

    Do: Watch on the big screen and copy each click: Part 1, scenes 1 and 2. Ingrid makes a new project and names the six areas of the screen. You do the same on your computer.

  3. 08:30-09:0015-45 min

    Part 1: Construct from zero

    Follow scenes 3 to 11 at your own pace. Use your own picture and your own words.

    Details & help

    Do: Follow scenes 3 to 11 at your own pace. Use your own picture and your own words. Each scene says how long it takes. Stuck? Open "Stuck?" under the scene, then ask. Save a .c3p before the break.

  4. 09:00-09:1045-55 min

    Break: step away

    Save your .c3p first. Then take a real break.

    Details & help

    Do: Save your .c3p first. Then take a real break. Stretch, get water or leave the screen.

  5. 09:10-09:4055-85 min

    Part 2: Alinta's map, or your own project

    Next page: build a map that keeps a secret. Or add the same tap rule to your own project.

    Details & help

    Do: Next page: build a map that keeps a secret. Or add the same tap rule to your own project. The template is a practice ground. Your own project counts more. Not finished? You continue in Lab 4.

  6. 09:40-09:4585-90 min

    Short break: reset

    Save your .c3p and take a real break.

    Details & help

    Do: Save your .c3p and take a real break. Stretch, get water or leave the screen.

  7. 09:45-09:5590-100 min

    Screenshot → Obligatory Task 4

    Preview your work, take a screenshot and post it on Mitt UiB under Obligatory Task 4.

    Details & help

    Do: Preview your work, take a screenshot and post it on Mitt UiB under Obligatory Task 4. Windows: Windows key + Shift + S. Mac: Cmd + Shift + 4. Linux: Print Screen. Then save your .c3p one more time.

  8. 09:55-10:00100-105 min

    One next step

    Write one thing you learned and one thing to try in Lab 4.

    Details & help

    Do: Write one thing you learned and one thing to try in Lab 4. Keep your .c3p file. Bring it next Friday.

Step 1 of 3 · Check in

Open your project, then step into today’s experiment.

Enter the project laboratory →

Get Alinta’s Construct files

Open the course Files section in MittUiB, download the .c3p named in your task, then open it from inside Construct.

How to download and open the project

Construct cannot see the file? Check here.

01PREPARE

Start here

New to Construct? A Layout is your scene. Properties change a selected object. An Event sheet connects a condition to an action. No AI required.

  1. Activate Pro using the instructions below.
  2. Part 1: Construct from zero. Learn the program step by step.
  3. Part 2: Alinta's Mapping template (next page). Build a map that keeps a secret.
  4. Post a screenshot under Obligatory Task 4.

BEFORE YOU OPEN CONSTRUCT / PRO LICENCE

Activate Construct 3 Pro.

The course has a Construct 3 Pro code, so you can explore more features than the free version offers.

  1. Find the code in Alinta’s announcement “Construct 3 Code and more!” in MittUiB.
  2. Open Construct 3 and sign in with your Construct account.
  3. At the top right, open the menu where you see your login information.
  4. Enter the code there. Check that your account now shows Pro.

Keep the code inside the course. It is shared with DIKULT105 students through MittUiB. Please do not post it anywhere public.

Stuck in Construct? Send AI a screenshot, or ask the forum, Reddit or YouTube. When you are unsure: where to get help ↗

02PRACTICE

Learn Construct from zero

Part 1 is here: one small project, built scene by scene. Part 2, Alinta's Mapping template, follows on the next page.

CONSTRUCT 1 / YOUR CAMPUS, YOUR STORY

Build a map. Hide a thought. Let someone find it.

PART 1 OF 2 · CONSTRUCT FROM ZERO

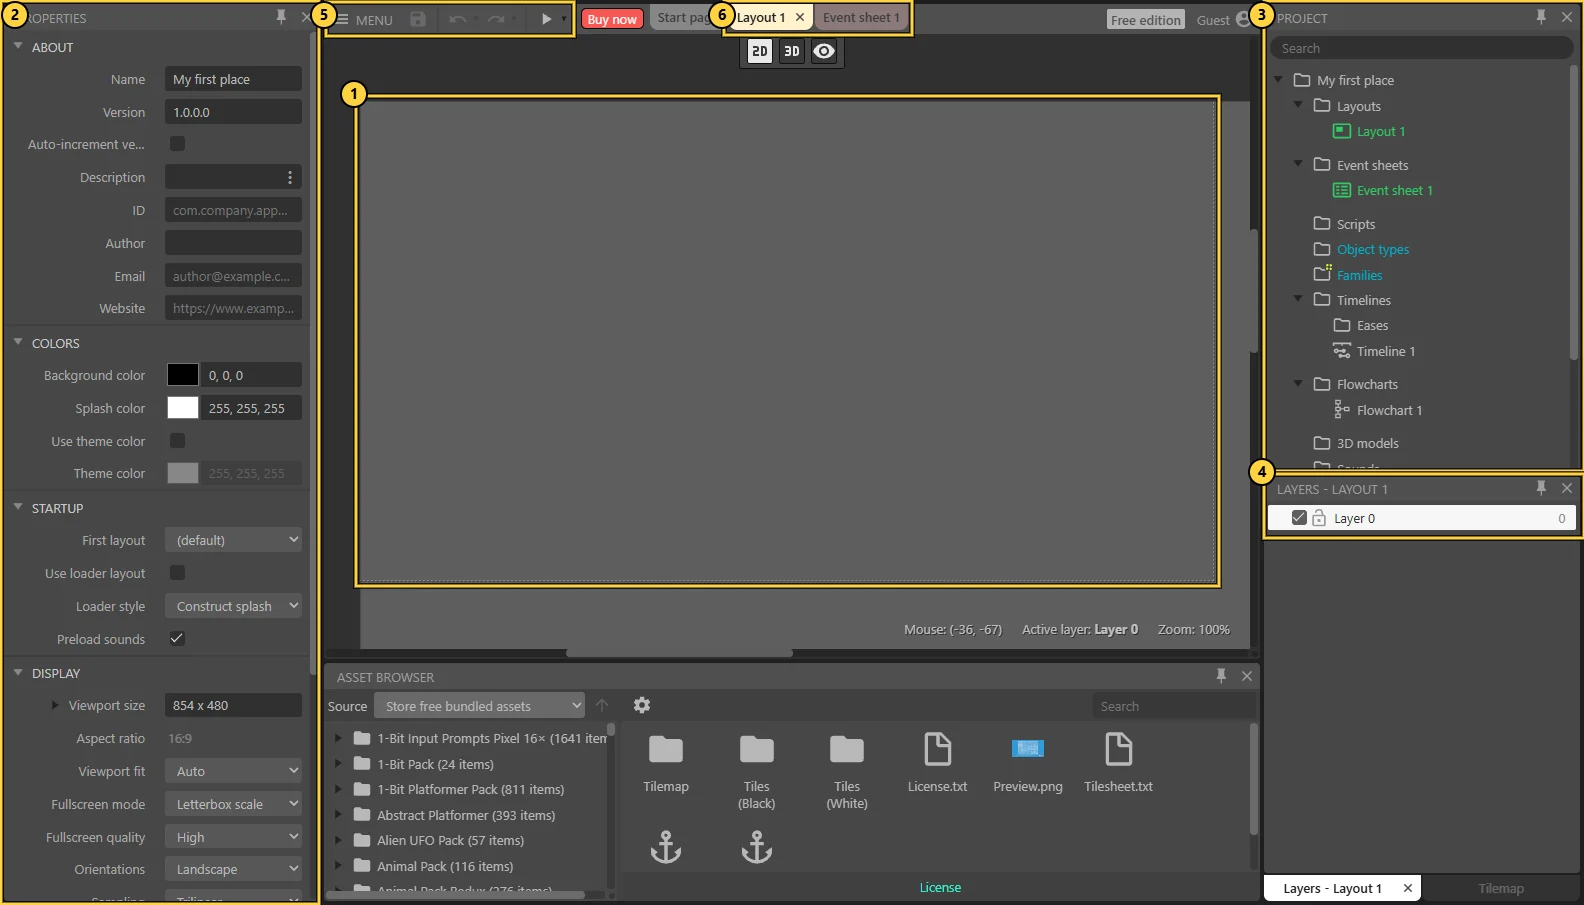
Keep Construct open beside this page and copy each step. You build one small project, scene by scene: every scene starts where the last one ended. The yellow numbers in the pictures match the steps.

Make it yours from the first click. Your place, your picture, your words. Already have a project? Do every step inside your own project instead of a new one.

Part 1 · Construct from zero · 1 of 11 · about 2 min

Start from nothing

SO FARNothing yet. Just Construct open in your browser.

NOWBefore anyone else's template, make something from an empty page. Then nothing in Construct will surprise you.

DO THIS

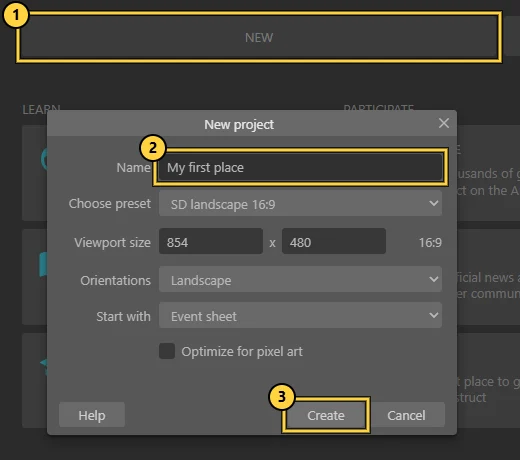
  1. Open editor.construct.net in Chrome or Edge.
  2. Click NEW ①.
  3. Give the project a name ②, such as My first place.
  4. Click Create ③.

YOU SHOULD SEE

An empty grey rectangle. That is your first layout.

Stuck? Open this first
  • A red "Get more events" bar: close it. You can work as a guest today, or sign in at the top right (Guest) and activate Pro.
  • Blank or slow page: use Chrome or Edge and reload once.

Still stuck after 3 minutes? Ask your neighbour or Ingrid. Everyone gets stuck: that is how you learn this program.

Construct start page with the New project dialog: Name field and Create button.

NEXT UP

Know your screen. Before you build, learn where everything is.

Part 1 · Construct from zero · 2 of 11 · about 3 min

Know your screen

SO FARAn empty project called My first place.

NOWSix areas. Learn their names once and every guide, tutorial and question makes sense.

DO THIS

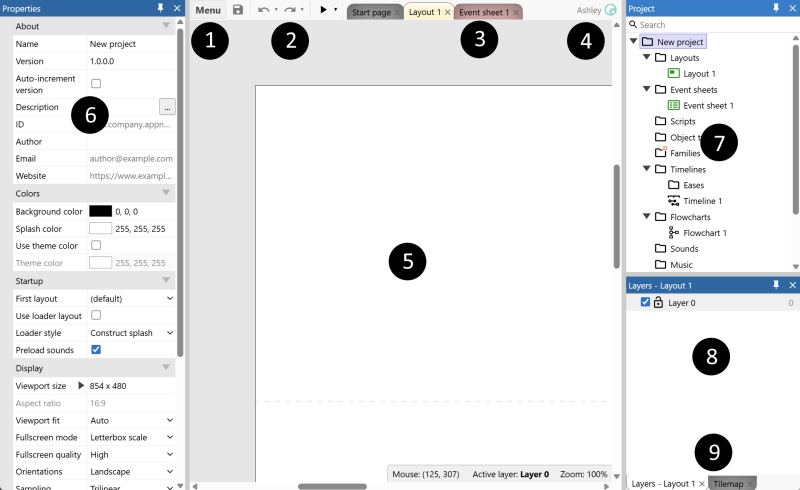
  1. Layout ①: the scene. What the visitor sees.
  2. Properties ②: settings for whatever you have selected.
  3. Project Bar ③: everything in the project. Layouts, event sheets, objects.
  4. Layers ④: transparent sheets stacked on top of each other.
  5. Menu, Save, Undo, ▶ Preview ⑤ and the tabs ⑥ that switch between a layout and its event sheet.

YOU SHOULD SEE

Click empty layout space: Properties shows the layout. Click an object: Properties shows the object.

The whole Construct editor with six numbered areas: Layout, Properties, Project Bar, Layers, toolbar and tabs.

NEXT UP

Put something in. Your first object goes into the Layout ①.

Part 1 · Construct from zero · 3 of 11 · about 3 minNew: Insert new object

Put something in

SO FARYou know the six areas, and the Layout is empty.

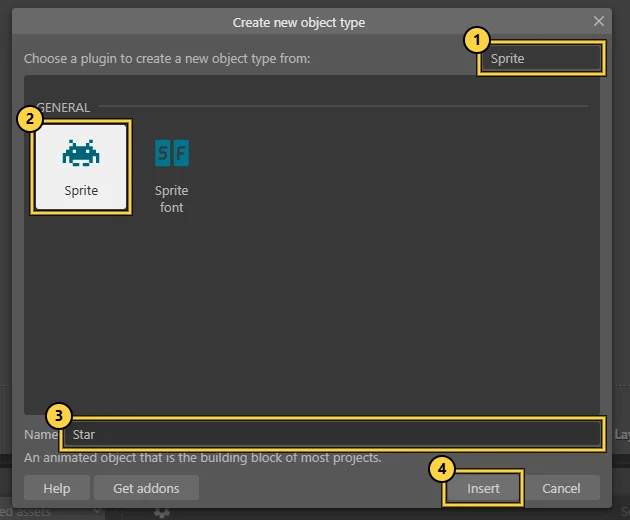
NOWEverything in Construct is an object. A Sprite is an object with a picture.

DO THIS

  1. Right-click empty layout space and choose Insert new object.
  2. Type Sprite in Search ①, select Sprite ②.
  3. Name it after what it is ③, such as Star. Then Insert ④.
  4. Click where it should go.

YOU SHOULD SEE

The image editor opens, ready for a picture.

Name things by what they are. Star, Library, Door. Never Sprite2. Your rules will read like sentences.

Stuck? Open this first
  • Nothing opens when you double-click: right-click empty layout space and choose Insert new object.
  • Inserted the wrong thing: press Ctrl + Z.

Still stuck after 3 minutes? Ask your neighbour or Ingrid. Everyone gets stuck: that is how you learn this program.

Create new object type dialog with Sprite selected and the name Star.

NEXT UP

Draw its picture. The image editor has just opened for your new Sprite.

Part 1 · Construct from zero · 4 of 11 · about 4 minNew: Image editor

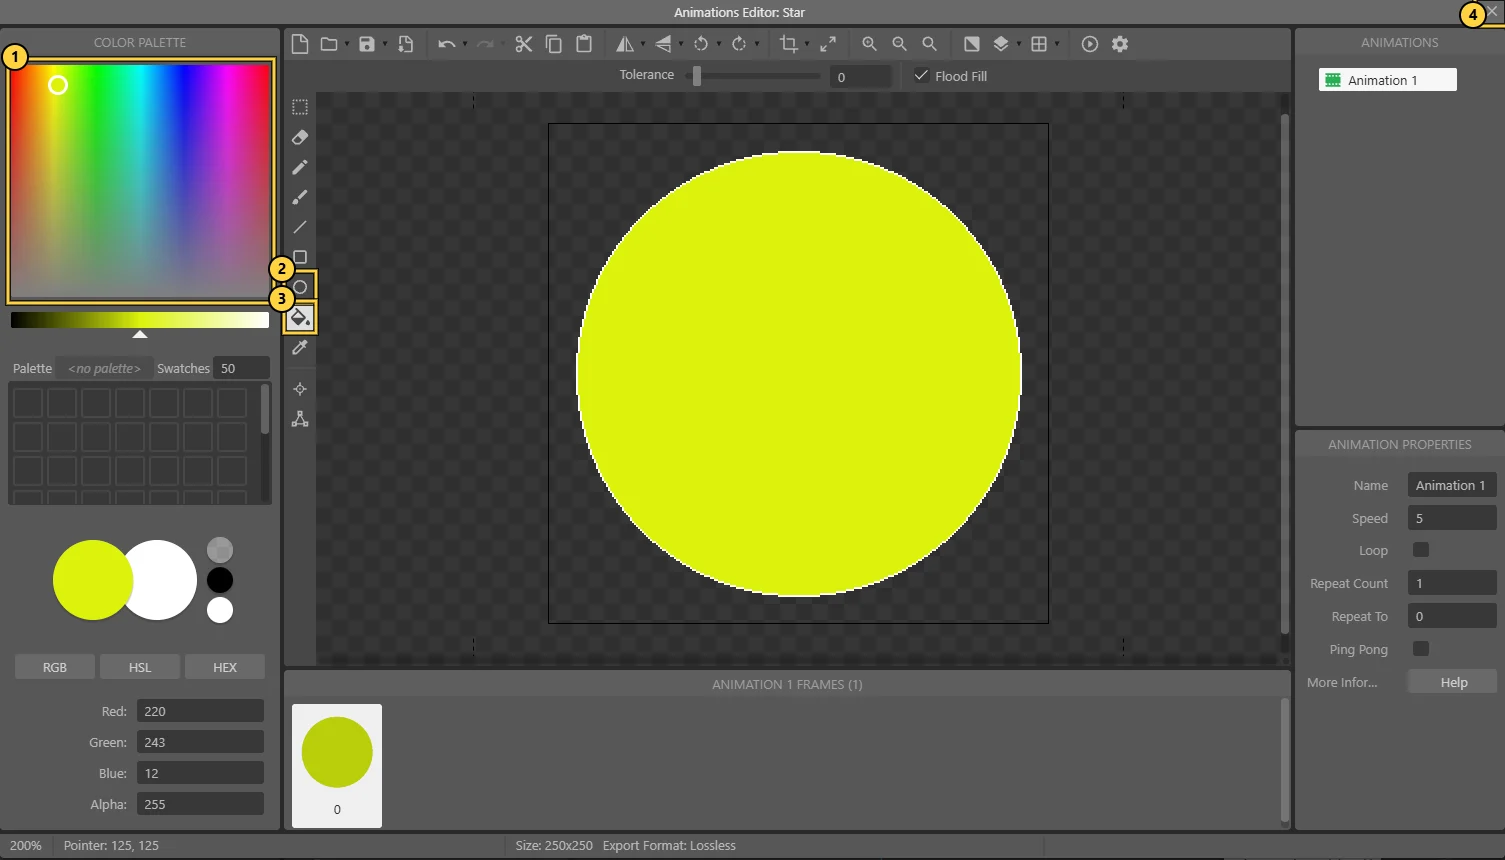
Draw or load its picture

SO FARA Sprite called Star, still without a picture.

NOWThe image editor is a small paint program inside Construct.

DO THIS

  1. Pick a colour ①.
  2. Choose the Ellipse tool ② and drag from the middle outwards.
  3. Choose Fill ③ and click inside the shape.
  4. Close the editor with × ④.

YOU SHOULD SEE

Your picture on the layout.

Have a PNG or JPG already? The folder icon in the editor's top bar loads a picture from your computer. Later, double-clicking the object opens this editor again.

Stuck? Open this first
  • The shape is cut off: the Ellipse grows from where you start. Press Ctrl + Z and drag from the middle.
  • Painted a mess: choose the rectangle select tool, press Ctrl + A, then Delete, and start again.
  • Closed the editor too early: double-click the object on the layout to reopen it.

Still stuck after 3 minutes? Ask your neighbour or Ingrid. Everyone gets stuck: that is how you learn this program.

Construct Animations Editor with colour palette, ellipse tool, fill tool and close button numbered.

NEXT UP

Move, size, turn. Put your picture exactly where you want it.

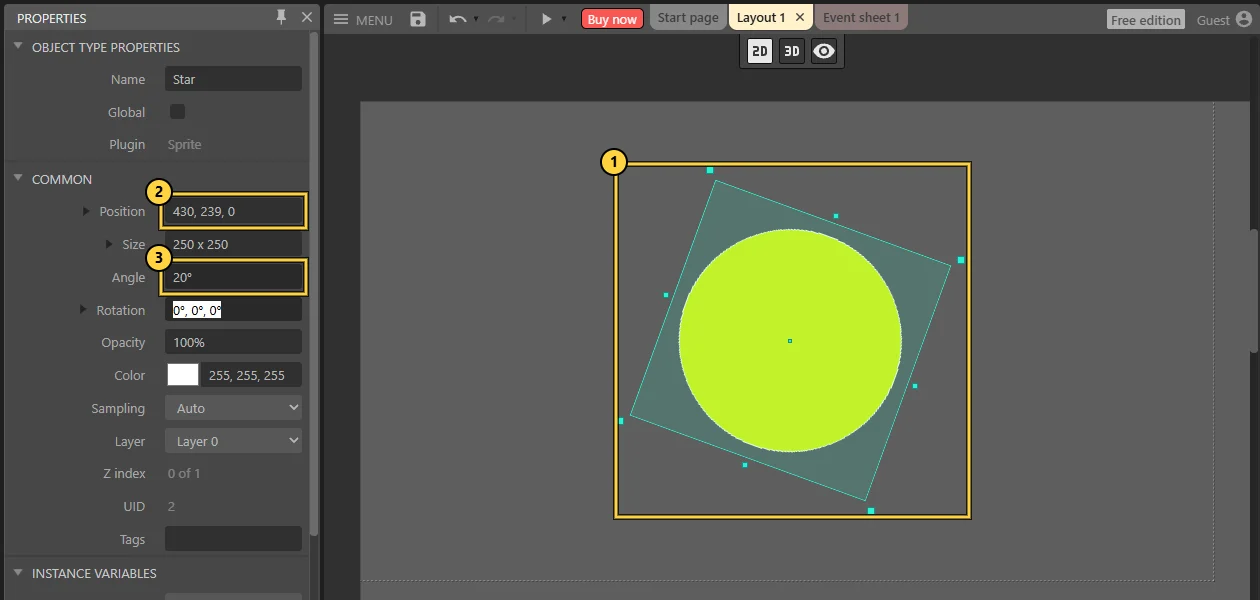
Part 1 · Construct from zero · 5 of 11 · about 2 min

Move, size, turn

SO FARA yellow Star on the Layout.

NOWArrange the scene by hand first. Use numbers when you need precision.

DO THIS

  1. Drag the object ① to move it. Drag a corner handle to resize.
  2. Or type exact numbers in Position ② and Angle ③ in Properties.

YOU SHOULD SEE

Properties change as you drag. They are the same thing, written as numbers.

Stuck? Open this first
  • The background moves instead: right-click it, Lock › Lock selection.
  • Cannot find the handles: click the object once. Small squares appear at the corners.

Still stuck after 3 minutes? Ask your neighbour or Ingrid. Everyone gets stuck: that is how you learn this program.

A selected sprite turned 20 degrees, with Position and Angle in Properties.

NEXT UP

Undo is your friend. Learn the safety net before you experiment more.

Part 1 · Construct from zero · 6 of 11 · about 1 minNew: Ctrl+Z

Undo is your friend

SO FARYour Star sits where you want it.

NOWYou will delete the wrong thing. Everyone does. It takes one key to fix.

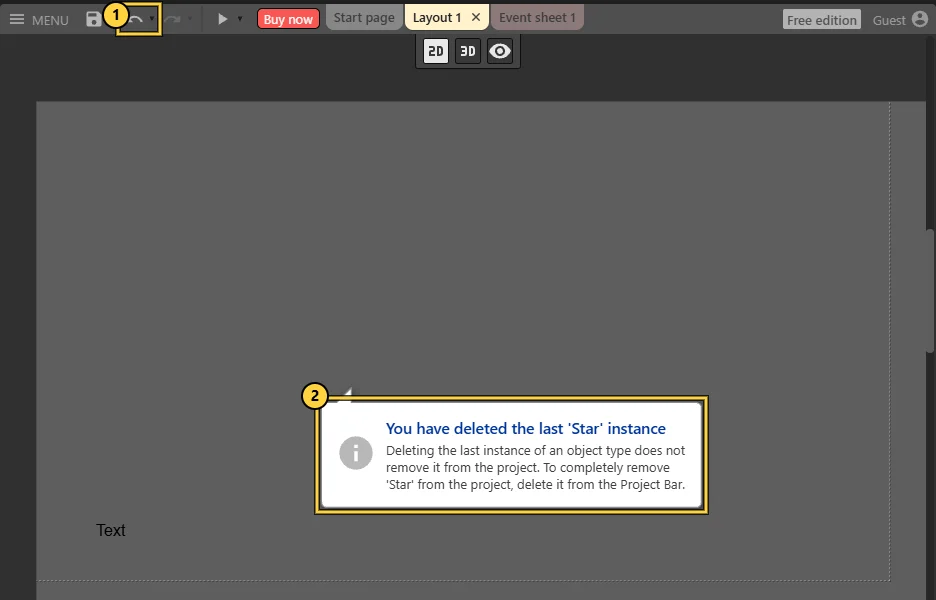
DO THIS

  1. Press Ctrl + Z (Mac: Cmd + Z) or click the Undo arrow ①.
  2. If you delete the last copy of an object, Construct tells you ②. Ctrl + Z brings it back.

YOU SHOULD SEE

The object is back where it was.

Construct warning: You have deleted the last Star instance, with the Undo button highlighted.

NEXT UP

Give it a skill. Make the Star move by itself, without any rules.

Part 1 · Construct from zero · 7 of 11 · about 4 minNew: Behaviors

Give it a skill

SO FARA Star you can experiment with safely.

NOWA behavior is a ready-made skill. No rules needed: the object just does it.

DO THIS

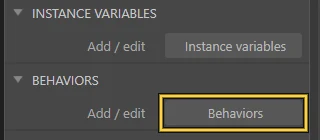
  1. Select the Star. In Properties, click Behaviors.
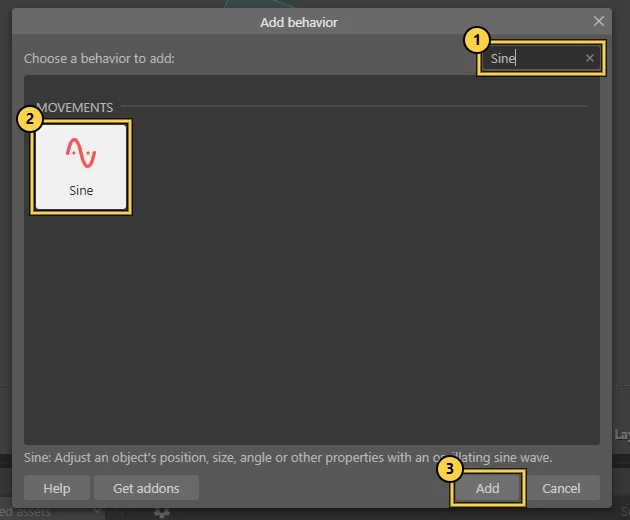
  2. Add new behavior, type Sine ①, select it ②, Add ③.
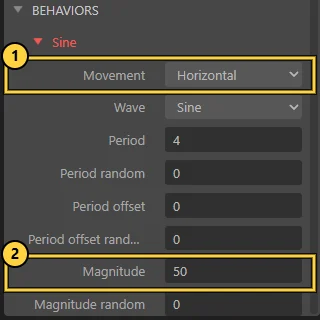
  3. Its settings appear in Properties: Movement ① and Magnitude ② (how far).

YOU SHOULD SEE

In Preview the Star glides from side to side:

PREVIEW · RUNNING
This is what Preview shows: Sine moves the Star left and right, over and over. Movement: Horizontal · Magnitude: 50 · Period: 4 seconds.

Try others later: Fade, Flash, Rotate, Drag & Drop, 8 Direction, Platform.

Stuck? Open this first
  • It does not move in Preview: check that the behavior sits on the right object, that Enabled is ticked and that Magnitude is above 0.
  • Cannot see the Behaviors button: select the object first. Properties only shows Behaviors for objects.

Still stuck after 3 minutes? Ask your neighbour or Ingrid. Everyone gets stuck: that is how you learn this program.

Properties panel with the Behaviors button highlighted.
Add behavior dialog with Sine selected.
Sine behavior settings in Properties: Movement and Magnitude.

NEXT UP

Your first rule: when… Behaviors are ready-made. Now write a rule of your own.

Part 1 · Construct from zero · 8 of 11 · about 4 minNew: Event sheet

Your first rule: when…

SO FARA Star that glides from side to side.

NOWBehaviors are skills. Events are your own rules. Every event is a sentence: when this happens, do that.

DO THIS

  1. Insert a Text object the same way, and name it Welcome.
  2. Open the Event sheet 1 tab and click Add event.
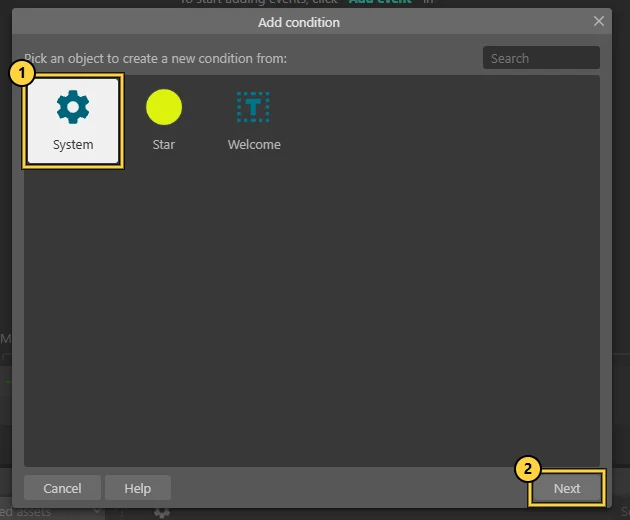
  3. Choose System ① (the project itself), then Next ②.
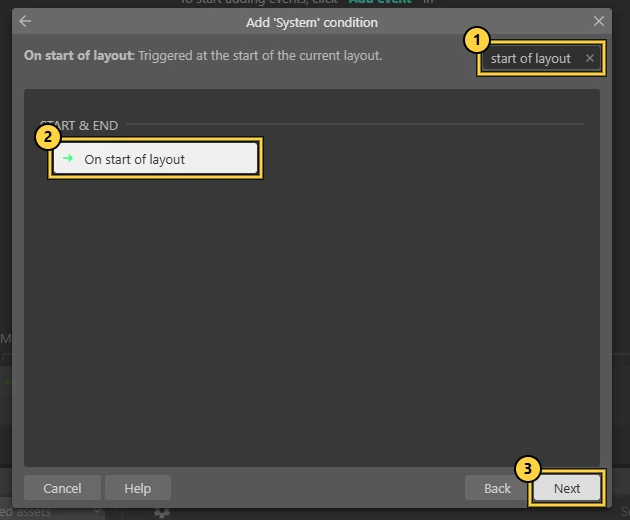
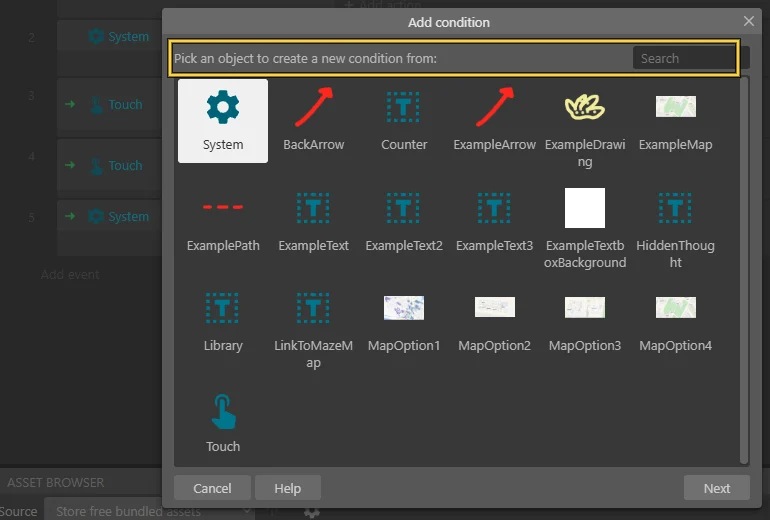
  4. Type start of layout in Search ①, choose On start of layout ②, Next ③.

YOU SHOULD SEE

A row with System: On start of layout on the left. That is the condition: when.

Stuck? Open this first
  • Cannot find the condition: type a word in Search. Every dialog has one at the top right.
  • Picked the wrong thing: double-click the condition to change it, or select it and press Delete.

Still stuck after 3 minutes? Ask your neighbour or Ingrid. Everyone gets stuck: that is how you learn this program.

Add condition dialog with System selected.
System conditions filtered to On start of layout.

NEXT UP

…then do this. Give your rule something to do.

Part 1 · Construct from zero · 9 of 11 · about 3 min

…then do this

SO FARA rule that listens for the start of the layout.

NOWNow the right half of the sentence: the action.

DO THIS

  1. On the same row, click Add action. Choose Welcome, then Next.
  2. Search set text, choose Set text, Next.
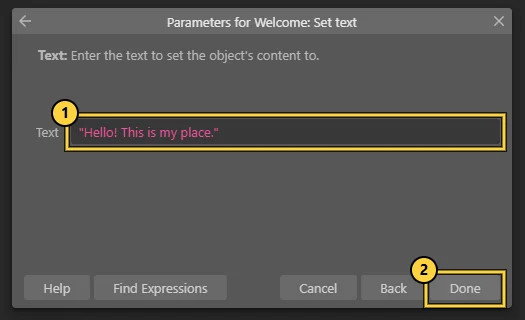
  3. Type your words inside "quotation marks" ①. Then Done ②.

YOU DID THIS IN LAB 2

story.textContent = "…" is the same as Set text. Construct writes the code for you.

YOU SHOULD SEE

One full rule. Condition on the left, action on the right.

Quotes rule: words go in "quotes". Numbers do not. Forget the quotes and Construct shows an error.

Stuck? Open this first
  • Red text or an error: words need "quotation marks" around them.
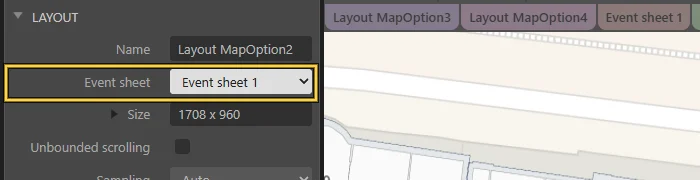
  • Nothing happens in Preview: click empty layout space. In Properties, Event sheet must say Event sheet 1.

Still stuck after 3 minutes? Ask your neighbour or Ingrid. Everyone gets stuck: that is how you learn this program.

Set text parameter with the words in quotation marks.
Finished event: System On start of layout, Welcome Set text to the quoted sentence.
Read it: when the layout starts, set Welcome's text.

NEXT UP

Play it, keep it. See everything run, then save the project.

Part 1 · Construct from zero · 10 of 11 · about 2 min

Play it, keep it

SO FARA moving Star and a rule that writes your words.

NOWTest often. Save often. Those two habits save every project.

DO THIS

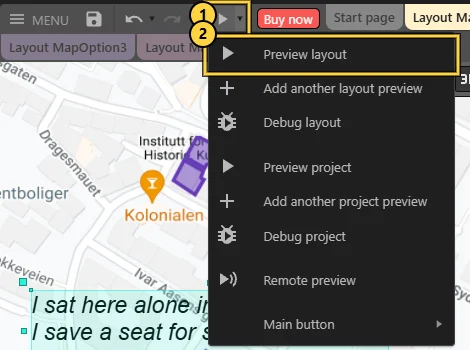
  1. ▶ menu › Preview layout. Watch the Star move and your text appear.
  2. Close the Preview window to keep editing.
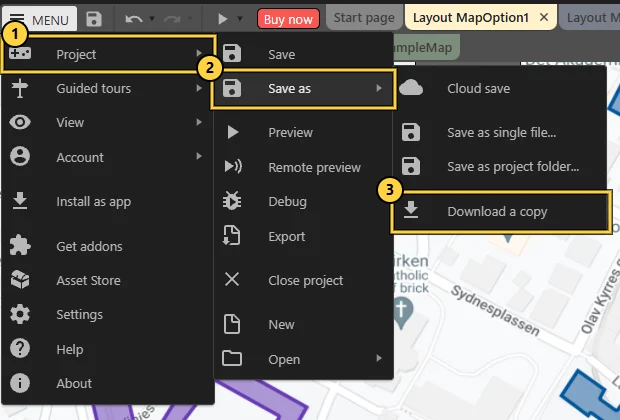
  3. Save: Menu › Project › Save as › Download a copy. You get a .c3p file.
  4. Open it again any time: Menu › Project › Open local file.

YOU SHOULD SEE

A .c3p file in Downloads. That one file is your whole editable project.

Stuck? Open this first
  • Preview does not open: allow pop-ups for editor.construct.net (the icon at the right of the address bar).
  • Cannot find the saved file: look in Downloads for a .c3p file. Open it with Menu › Project › Open local file.

Still stuck after 3 minutes? Ask your neighbour or Ingrid. Everyone gets stuck: that is how you learn this program.

Preview dropdown with Preview layout highlighted.
The ▶ menu. Your project looks different behind it; the menu is the same.
Menu open at Project, Save as, Download a copy.
Menu › Project › Save as › Download a copy. Same menu in every project.

NEXT UP

What to remember. Ten habits to take with you into Part 2.

Part 1 · Construct from zero · 11 of 11 · about 2 min

What to remember in Construct

SO FARA saved .c3p file: your first Construct project.

NOWTen rules that solve most problems before they happen.

DO THIS

  1. Save a .c3p every 20 minutes. Download a copy. Construct does not save to your computer by itself.
  2. Preview layout tests the layout you are looking at. Preview project starts at the first layout.
  3. Every layout needs its Event sheet set in Properties, or its rules never run.
  4. Name objects by what they are.
  5. Words go in "quotes". Numbers do not.
  6. Search in every dialog. The lists are long.
  7. Ctrl + Z undoes almost anything.
  8. Double-click a picture opens the image editor. Right-click opens the menu.
  9. Initially visible off means hidden until a rule shows it.
  10. Guests get 25 events per project. Activate Pro (above) for more.

YOU SHOULD SEE

Ready. Part 2 uses all of this on a real map of our campus.

Want more after today? Follow Construct's official Beginner's guide. It uses the same buttons you just learned. Everything from today is also in the Construct toolkit.

A finished event row.
Events run top to bottom, many times a second. "On…" conditions fire once.

NEXT UP

Part 2: Alinta's map. The same tools, used on a real map of our campus.

NEXT PAGE · PART 2 OF 2 · ABOUT 40 MINAlinta's map: build a place that keeps a secret →Open her Mapping template, add your places, hide a thought and reveal it with a tap. Then post your screenshot under Obligatory Task 4.

03REQUIRED

Your project

YOUR IDEA / YOUR DECISION

What does a tap reveal about your place?

Compose a campus story in Construct, or bring the same idea into your own project. Keep your own voice in the text.

EXPERIMENT 03Ready when you are

YOUR WORKBENCH

Map three places

Compose a campus story in Construct. Keep your own voice in the text.

What does a tap reveal about your place?

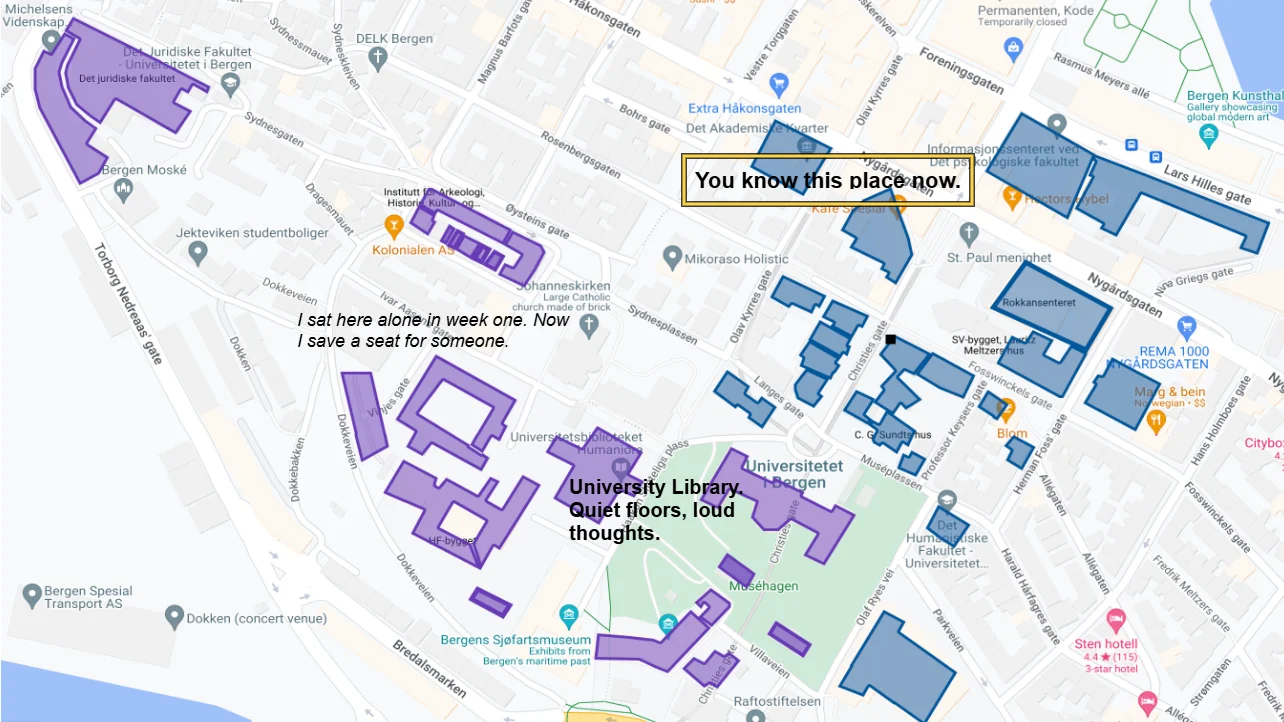
Get MappingasNonlinearStorytelling (2).c3p in MittUiB Files ↗

Then follow the template walkthrough →

Already working on something? Apply these steps to your own project. No AI required.

Your experiment checklist

Try these practical steps in your project. Check them when you have tested the result.

Experiment 3 milestones
0 / 3 milestones

Enable JavaScript to save a personal checklist on this device. The guides and schedule work without it.

Experiment not behaving? Open the help drawer.

Start small: describe what you expected, then what actually happened. Change one thing and try again.

Ask for help: “Can we look at this together?” Nobody is expected to know everything.

Need a pause?Take it. Your progress stays here when storage is available. Scheduled breaks: 09:00-09:10 and 09:40-09:45 (morning), or 15:00-15:10 and 15:40-15:45 (afternoon).

04WHEN YOU NEED IT

⏱ Whenever you need it

Examples and guides

Step-by-step guides and official screenshots. Open it when you need it.

Open the Construct guides
Next level: save & reflect →

TURING’S LAB / LAB 3 MACHINE

Relay detective + sound machine

Inspect a failed response, then test your repair. Connect it to the tap on your map.

Enter this machine →

Optional experiment, 3-5 minutes within project time. All machines are open.

LAST STOP / LAB 03

Keep your work. Make a note.

  1. Save your project files. Keep a copy somewhere you can find again.

Your experiment checklist and notes are saved in this browser when storage is available.

Return to the lab map ↑

Confirm your saved work below, then launch your finish screen.

Before you mark this quest complete
Save your work

What you can take from this lab

Leave with: Visible, saved progress on your own project, using today’s technique where relevant; the starter exercise is available for anyone who needs it.

Connect to the course: Affordances and creative coding: different tools make different actions easy to build. The artistic intention can remain while the implementation changes.

LAB 04 / FRIDAY 23 OCTOBER 2026

Construct 2: rules and rooms

How does a room remember a choice, and how does the player find a way back?

Morning · 08:15-10:00 · 105 minutes

Today's timetable · two breaks: 09:00-09:10 and 09:40-09:45 (morning), 15:00-15:10 and 15:40-15:45 (afternoon)
  1. 08:15-08:200-5 min

    Arrive: open your Lab 3 map

    Open Construct and your .c3p from last week.

    Details & help

    Do: Open Construct and your .c3p from last week. No file? Start from Alinta's Mapping template and Lab 3, Part 2. Open your own project if you have one.

  2. 08:20-08:305-15 min

    Together: what is a variable?

    Watch on the big screen and copy: Part 1, scenes 1 and 2.

    Details & help

    Do: Watch on the big screen and copy: Part 1, scenes 1 and 2. Ingrid opens a Lab 3 map and adds the global variable visits. You do the same.

  3. 08:30-09:0015-45 min

    Part 1: rules that remember

    Scenes 3 to 6: count, show the number, a rule that waits for 3.

    Details & help

    Do: Scenes 3 to 6: count, show the number, a rule that waits for 3. Each scene says how long it takes. Stuck? Open "Stuck?" under the scene, then ask. Save before the break.

  4. 09:00-09:1045-55 min

    Break: step away

    Save your .c3p first. Then take a real break.

    Details & help

    Do: Save your .c3p first. Then take a real break. Stretch, get water or leave the screen.

  5. 09:10-09:4055-85 min

    Part 2: rooms and the way back

    A second room, a back arrow and the round-trip test.

    Details & help

    Do: A second room, a back arrow and the round-trip test. Or add a second room and a variable to your own project. Not finished? Continue in Lab 5.

  6. 09:40-09:4585-90 min

    Short break: reset

    Save your .c3p and take a real break.

    Details & help

    Do: Save your .c3p and take a real break. Stretch, get water or leave the screen.

  7. 09:45-09:5590-100 min

    Final gate: Obligatory Task 5

    Light the seven seals, take a screenshot and post it under Obligatory Task 5.

    Details & help

    Do: Light the seven seals, take a screenshot and post it under Obligatory Task 5. Windows: Windows key + Shift + S. Mac: Cmd + Shift + 4. Linux: Print Screen. Save your .c3p one more time.

  8. 09:55-10:00100-105 min

    One next step

    Write one thing you learned and one thing to try in Lab 5.

    Details & help

    Do: Write one thing you learned and one thing to try in Lab 5. Keep your .c3p file. Bring it next Friday.

Step 1 of 3 · Check in

BOOT UP · 5 MIN

Three lights on. Then we play.

0 of 3 lights on.

Lights on? Today your world learns to remember.

Enter Turing’s map room →

01BUILD

Your map, level 2

12 scenes. Each one adds a piece to your map and 10 XP.

TURING’S MAP ROOM · LAB 4

Make a world
that remembers.

Four new powers: memory, a rule that waits, doors and a way back. Learn them on Alinta’s map, then use them in your own project.

Your final work: an interactive piece about speculative digital futures, on itch.io by week 50. Final quest →

Watch the visitor: the number goes with them. The thought stays behind.

Cartoon: Dr. Turing points at a map on a screen. A small visitor taps a place three times and the number visits counts 1, 2, 3. The visitor walks through an arrow to room 2 and back. visits is still 3, but the thought bubble in room 1 is gone.TURING’S MAP ROOMGLOBAL visits =0123MapOption1MapOption2Visits:0123hello+1visits is still 3EVENTS 5/25

LAB 4 · CONSTRUCT BESIDE THIS PAGE · YOUR OWN MAP

RANK Visitor

0 / 120 XP

ROOM 2locked

Finish a scene to build your map here.

Part 1 · 1/6 · 3 min

Load your save

Last week's map. Everything today builds on it.

  1. Menu › Project › Open local file › your Lab 3 .c3p.
  2. Open the Event sheet 1 tab.
    Event sheet with the Lab 3 rule: Touch on tap Library, HiddenThought set visible.

✓ CHECK On tap gesture on Library › Set visibility Visible.

YOUR PROJECT Own Construct project? Open that instead. Every scene works on any layout: use your object where it says Library.

Stuck?
  • No file from last week? Get the Mapping template in Mitt UiB › Files and play Lab 3, Part 2 first (25 min).
  • Your place is not called Library? Perfect. Use your own names.

Still stuck after 3 minutes? Ask your neighbour or Ingrid.

NEXT

Give it a memory

Part 1 · 2/6 · 3 min+ Global variable

Give it a memory

A variable is a named box with a number in it. Global: every room can read it.

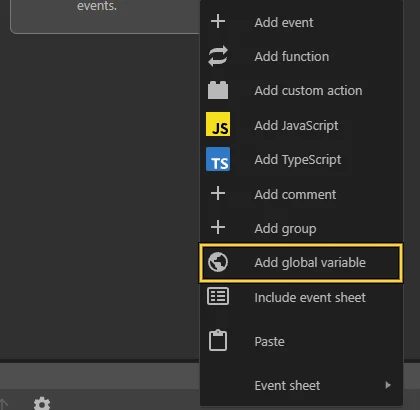
  1. Right-click empty sheet space › Add global variable ①.
    Right-click menu in the event sheet with Add global variable highlighted.
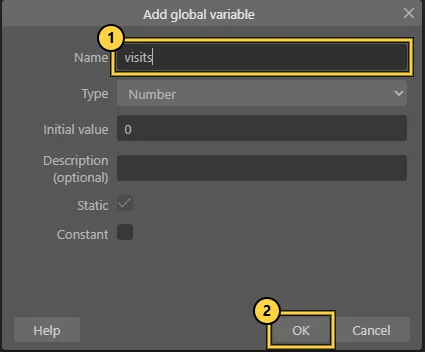
  2. Name visits ①, Number, 0, OK ②.
    Add global variable dialog with the name visits.

✓ CHECK Global number visits = 0 at the top.

YOUR PROJECT Name the box after what your work should remember.

Event sheet with the line Global number visits = 0.
Stuck?
  • Greyed out? Right-click empty sheet space, not an event row.
  • Name refused? No spaces: visits, keysFound.

Still stuck after 3 minutes? Ask your neighbour or Ingrid.

NEXT

Count each visit

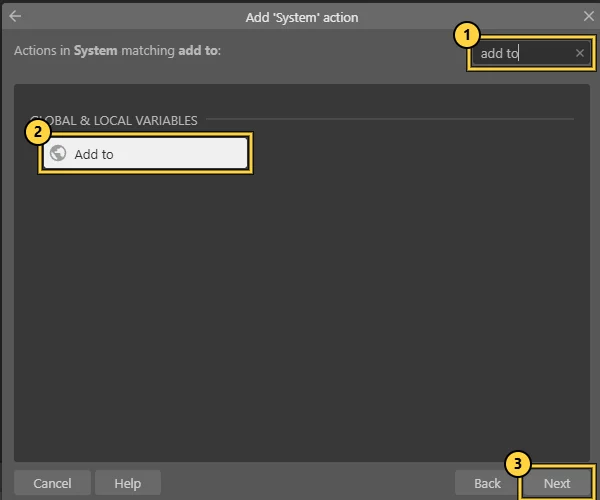
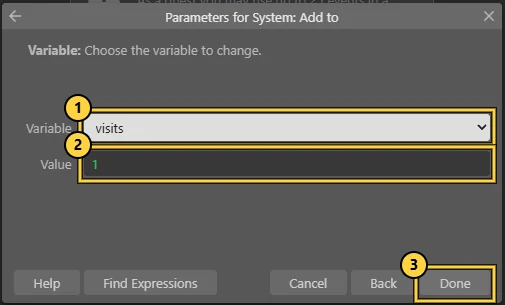
Part 1 · 3/6 · 3 min+ Add to

Count each visit

Every tap adds 1. One event can do several things.

  1. Tap row › Add action › System › search add to ① › Add to ② › Next ③.
    System actions filtered by add to.
  2. visits ① · 1 ② · Done ③.
    Add to parameters: variable visits, value 1.

✓ CHECK Two actions: Set visible + Add 1 to visits.

YOUR PROJECT Every tap, choice or step can add something.

NEXT

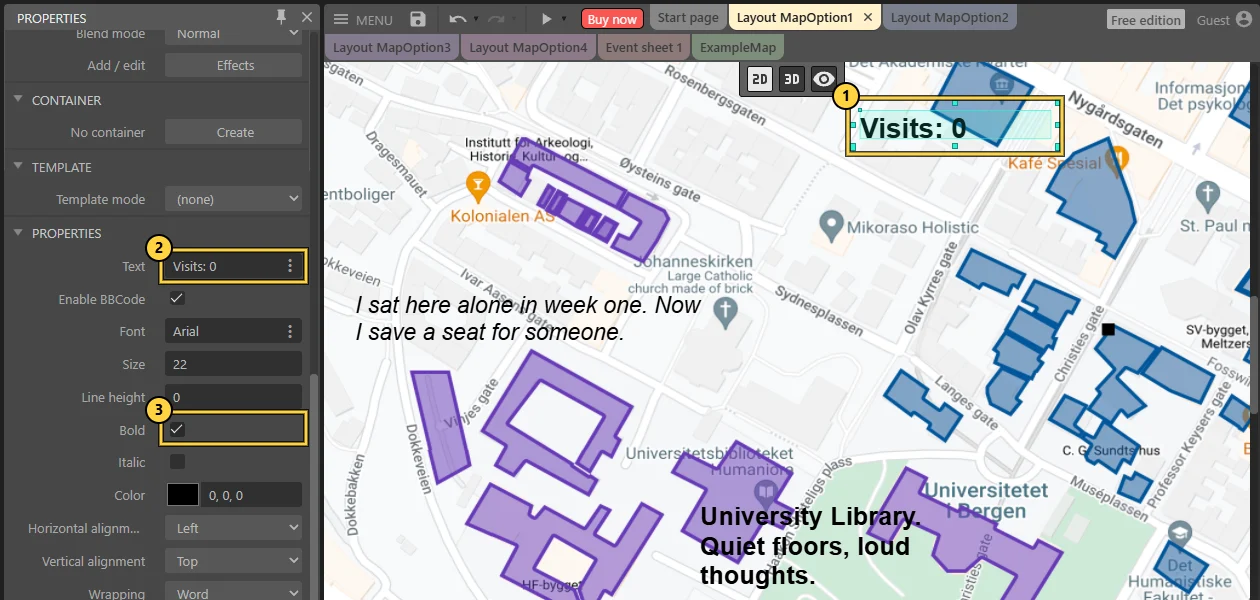
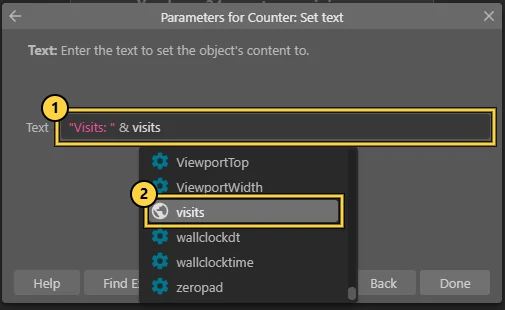
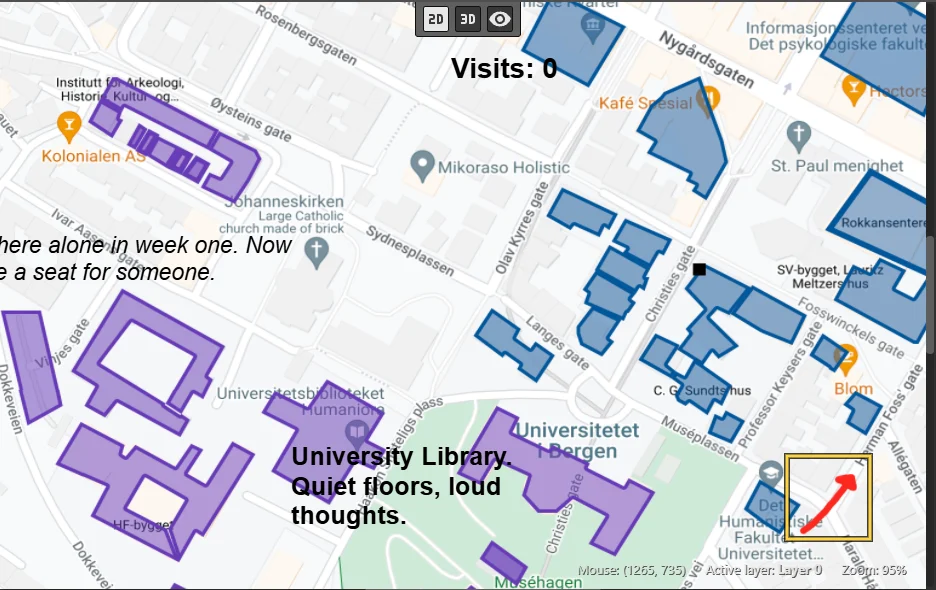
Show the number

Part 1 · 4/6 · 5 min+ Expressions

Show the number

Your map counts in secret. Put the number on screen.

  1. Insert Text, name it Counter ①. Text Visits: 0 ②, Bold ③. Drag it wider.
    Counter text object on the map with Text Visits: 0 and Bold ticked.
  2. Tap row › Add action › Counter › Set text › "Visits: " & visits ①②.
    Set text parameter with "Visits: " & visits and the autocomplete list.

✓ CHECK One event, three actions.

YOUR PROJECT Should the visitor see the number? Sometimes a hidden memory is stronger.

Event row with three actions.
What does & do?

"Visits: " in quotes is text. visits without quotes is the variable. & glues them.

Stuck?
  • Red text? Every quote mark needs a partner.
  • It shows the word visits? Move visits outside the quotes.

Still stuck after 3 minutes? Ask your neighbour or Ingrid.

NEXT

A rule that waits

Part 1 · 5/6 · 5 min+ Compare variable

A rule that waits

On the third visit, the place answers.

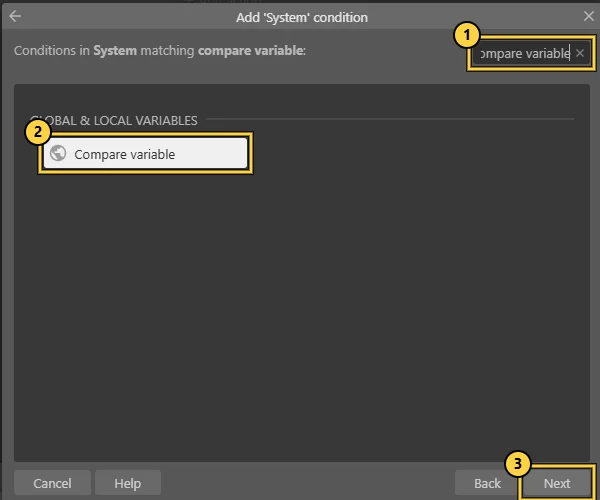
  1. Add event › System › search compare variable ①②, Next ③.
    System conditions filtered by compare variable.
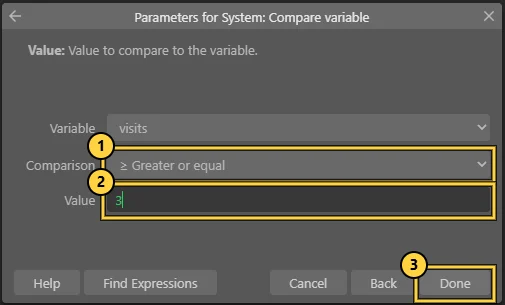
  2. ≥ ① · 3 ② · Done ③.
    Compare variable: visits greater or equal 3.
  3. Add action › Counter › Set text › "You know this place now."
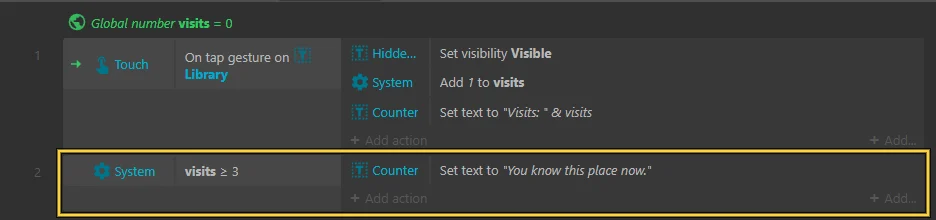
    Two events: the tap rule and visits ≥ 3.

✓ CHECK Event 2: visits ≥ 3 › Set text.

YOUR PROJECT What happens when the number reaches something? That is your rule.

NEXT

Play it

Part 1 · 6/6 · 3 min

Play it

Be your own visitor. Count out loud.

  1. ▶ › Preview layout. Tap your place.
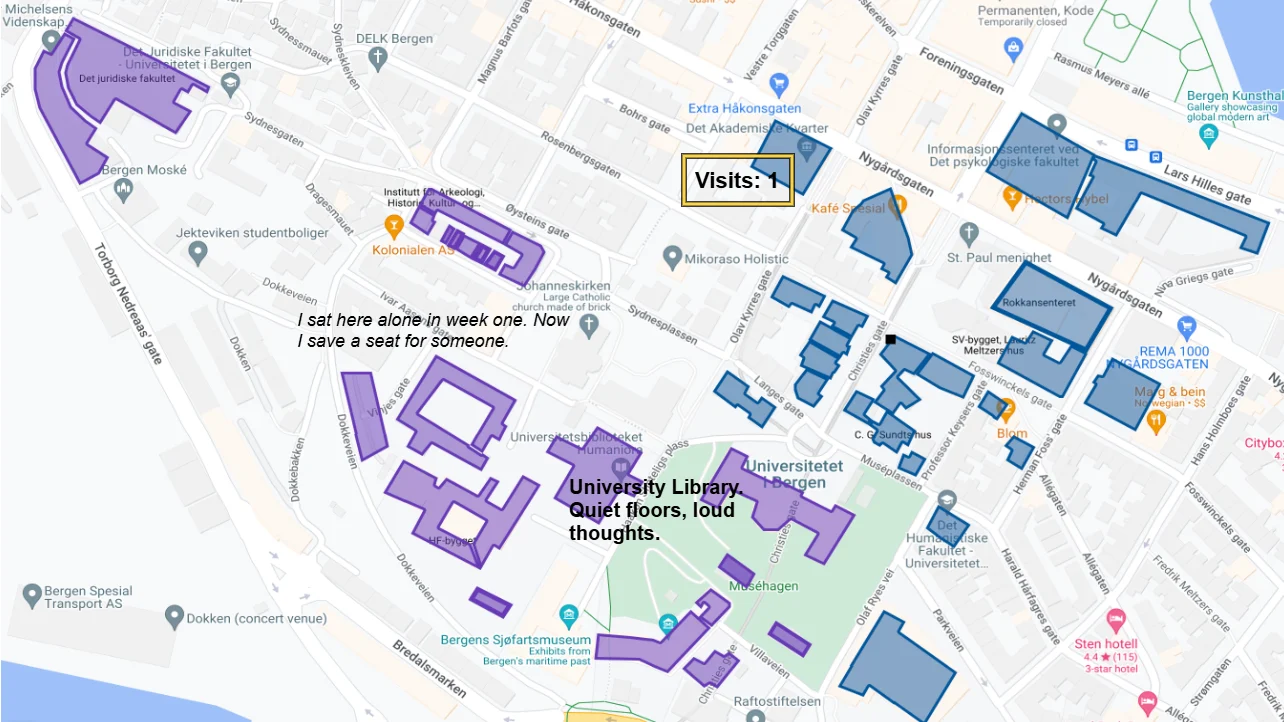
    Preview: Visits: 1.
    Tap 1.
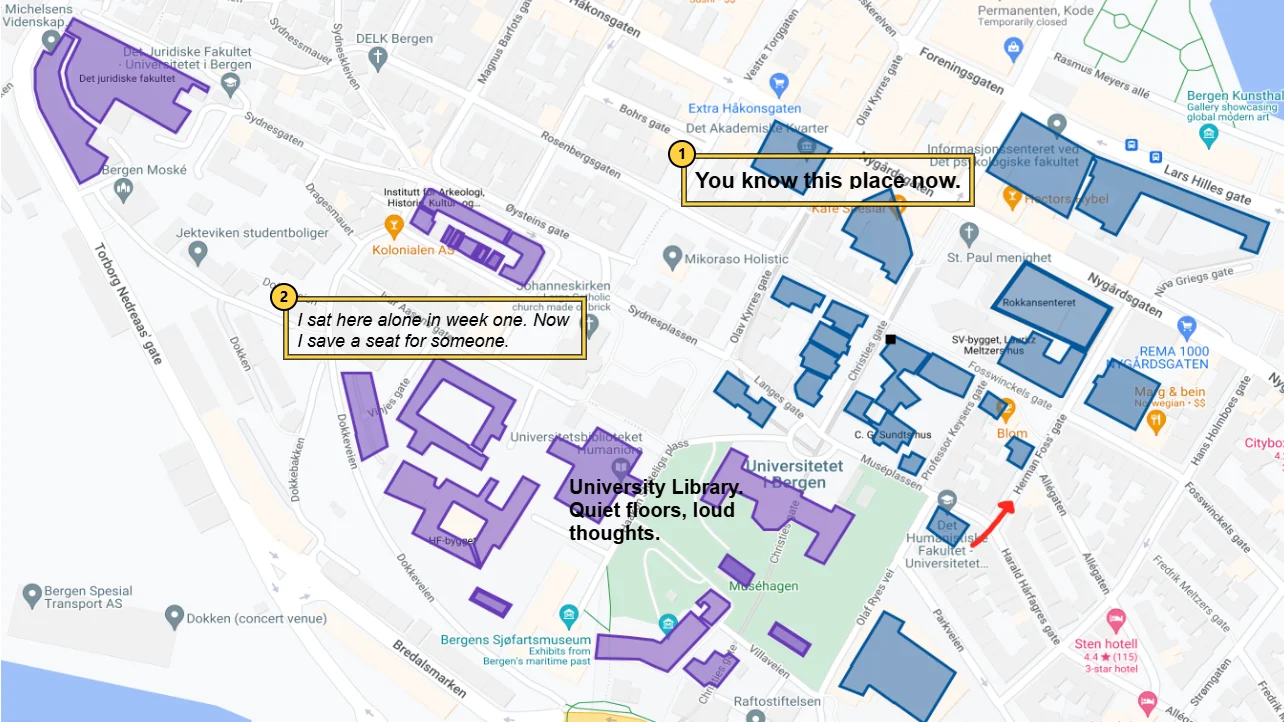
  2. Tap twice more.
    Preview: You know this place now.
    Tap 3.

✓ CHECK 1, 2, then the message.

Stuck?
  • Number stuck? Set text must be on the same row as Add 1.
  • No message? Use ≥ 3, not = 3.
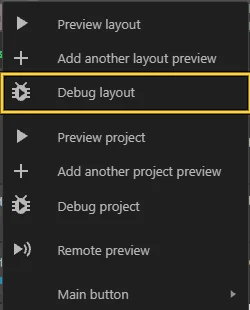
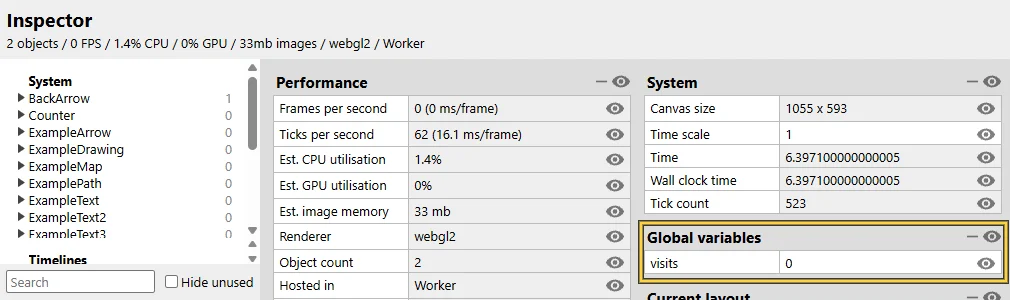
  • Not sure what visits is? ▶ menu › Debug layout shows it live under Global variables.

Still stuck after 3 minutes? Ask your neighbour or Ingrid.

NEXT

Part 2: a second room

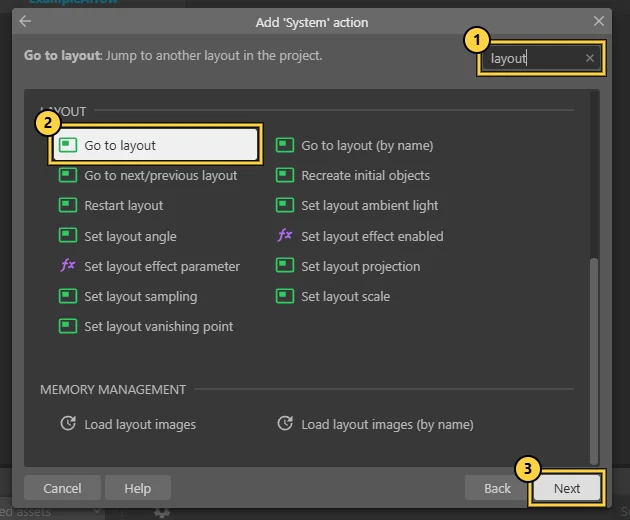
Part 2 · 1/6 · 4 min+ Go to layout

A door to room 2

A room is a layout. An arrow with a tap rule is a door.

  1. Drag ExampleArrow onto your map ①.
    ExampleArrow placed on the map.
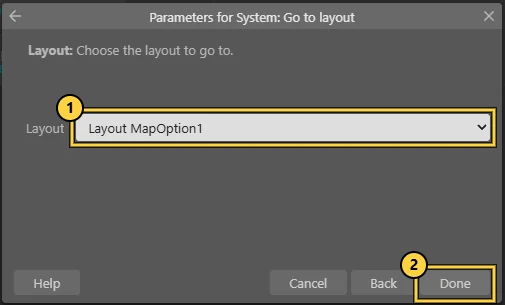
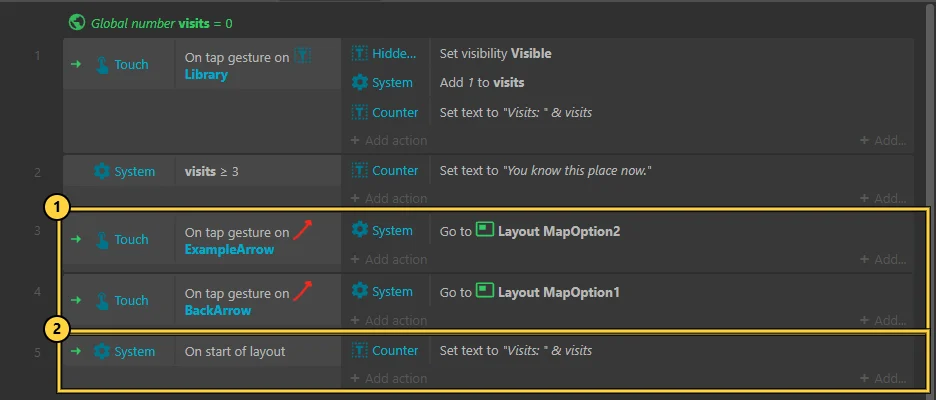
  2. Add event › Touch › On tap object › ExampleArrow. Action › System › Go to layout › MapOption2.
    System actions filtered by layout with Go to layout.

✓ CHECK On tap ExampleArrow › Go to MapOption2.

YOUR PROJECT A layout can be a chapter, a level, a page or an ending.

NEXT

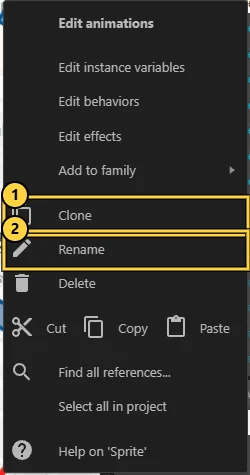
A way back

Part 2 · 2/6 · 3 min+ Clone

A way back needs its own arrow

One tap rule per object type. A renamed copy can do the opposite.

  1. Project Bar: right-click ExampleArrow › Clone ①.
    Object type menu with Clone and Rename.
  2. Right-click the copy › Rename ② › BackArrow.

✓ CHECK BackArrow in the Project Bar.

NEXT

Set up room 2

Part 2 · 3/6 · 4 min+ Event sheet per layout

Set up room 2

A room without an event sheet has no rules. Share Event sheet 1.

  1. Open MapOption2. Right-click the map › Lock › Lock selection.
  2. Click the map › Properties › Event sheet: Event sheet 1 ①.
    Layout MapOption2 properties with Event sheet set to Event sheet 1.
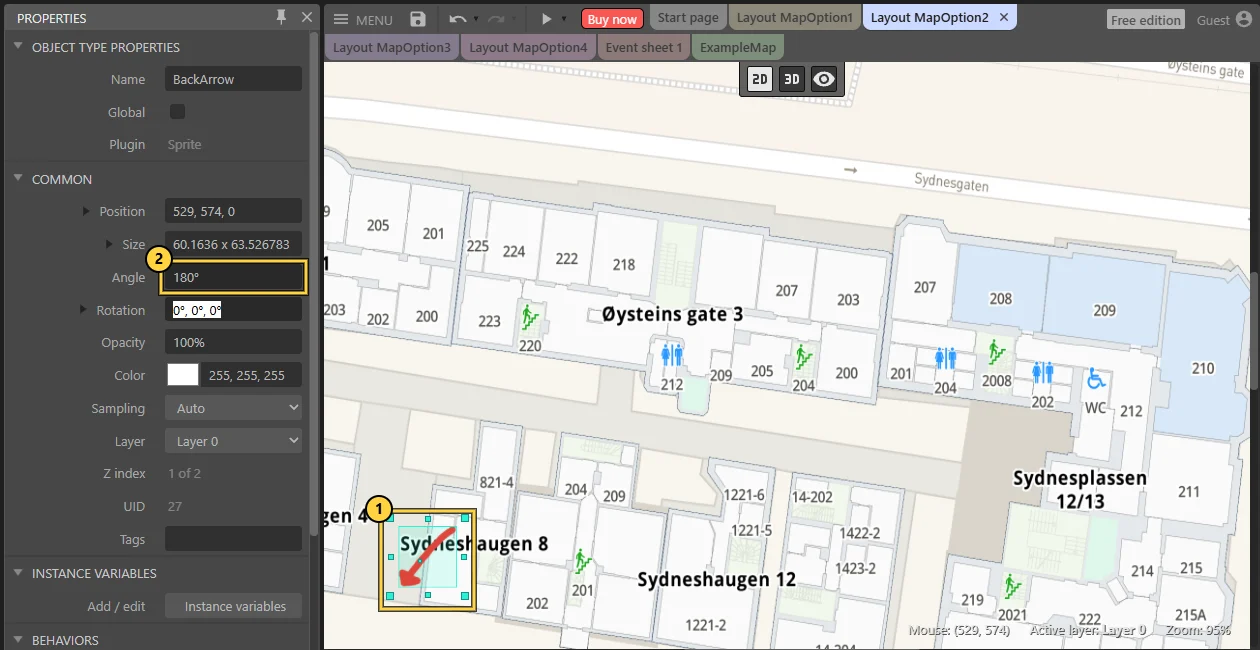
  3. Drag in BackArrow ①, Angle 180 ②.
    BackArrow placed in room 2 with Angle 180.

✓ CHECK An arrow pointing back. Event sheet 1 in Properties.

Stuck?
  • Event sheet (none)? No rules run there. The most common Lab 4 mistake.

Still stuck after 3 minutes? Ask your neighbour or Ingrid.

NEXT

Close the loop

Part 2 · 4/6 · 5 min+ On start of layout

Close the loop

Wire the way back, and repaint the counter when a room starts.

  1. Add event › Touch › On tap object › BackArrow › Go to layout › MapOption1 ①②.
    Go to layout parameters with Layout MapOption1.
  2. Add event › System › On start of layout › Counter › Set text › "Visits: " & visits.
    Five events: tap, compare, two arrows and on start of layout.

✓ CHECK Five events.

YOUR PROJECT Is the way back open, locked, or changed? Leaving it out is a choice too.

Why On start of layout?

A room resets every object when it starts. The text would say Visits: 0, even though visits still holds 2.

NEXT

The round trip

Part 2 · 5/6 · 4 min

The round trip

The big idea of today. Watch what is remembered.

  1. Preview MapOption1. Tap your place twice, then the arrow ①.
    Preview of room 2 with the back arrow.
    Room 2.
  2. Tap the back arrow.
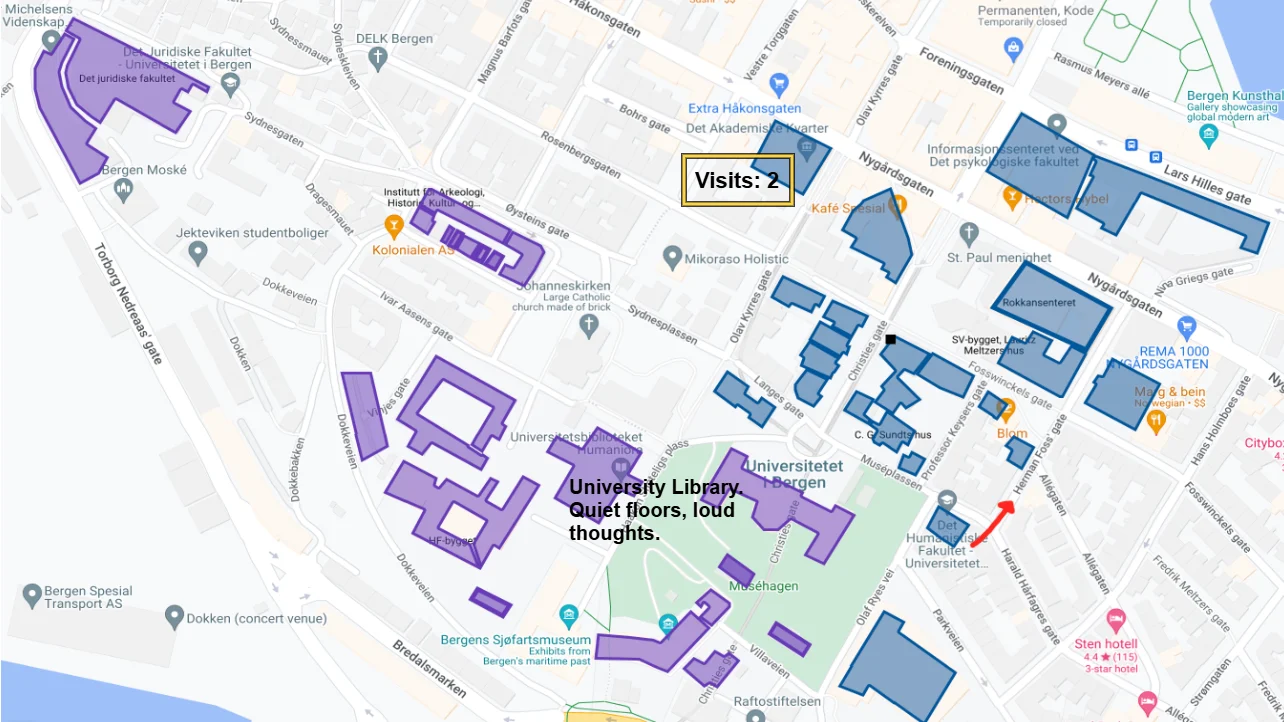
    Preview back in room 1: Visits: 2 and the thought hidden again.
    Visits: 2. Thought hidden again.
  3. Tap your place once more.
    Preview: You know this place now, and the thought shows.
    Visit 3: it answers.

✓ CHECK The variable remembered. The room forgot.

YOUR PROJECT Ask: what does your world remember when you leave a room?

Stuck?
  • Visits: 0 when you return? Add On start of layout, or check room 1 uses Event sheet 1.
  • Preview starts in room 2? Click the MapOption1 tab first.
  • Guest limit? 5 of 25 events used. Pro gives more.

Still stuck after 3 minutes? Ask your neighbour or Ingrid.

NEXT

Save your game

Part 2 · 6/6 · 2 min

Save your game

This file is your Lab 5 starting point.

  1. Menu › Project › Save as › Download a copy.
    Menu › Project › Save as › Download a copy.

✓ CHECK Rename it yourname-lab4.c3p.

YOUR PROJECT Working in your own project? Save that one too, with today's powers in it.

NEXT

The hand-in gate

POWER-UPS

Pro tips. Collect them all.

  1. CONSTRUCT · 1/8

    See your variable live

    ▶ menu › Debug layout. Tap your place: Global variables › visits counts up.

    The Preview menu with Debug layout highlighted.
    The debugger Inspector with Global variables: visits.
  2. CONSTRUCT · 2/8

    Double-click = Add event

    Double-click empty space in the event sheet. The Add condition dialog opens.

    Add condition dialog opened by a double-click in the event sheet.
  3. CONSTRUCT · 3/8

    Type, don't scroll

    Every dialog has a Search box. Type two or three letters: add, comp, lay.

  4. CONSTRUCT · 4/8

    Copy a whole event

    Click an event row, Ctrl + C, Ctrl + V. Then change one thing. Mac: Cmd.

  5. CONSTRUCT · 5/8

    Watch the event counter

    Guests get 25 events. Construct shows how many are left. Lab 4 uses 5.

  6. CONSTRUCT · 6/8

    Text cut off?

    The Text box is too small. Drag a corner handle wider.

  7. CONSTRUCT · 7/8

    Save every 20 minutes

    Menu › Project › Save as › Download a copy. Name it yourname-lab4.c3p.

  8. CONSTRUCT · 8/8

    Construct wants you to rest

    After two hours it tells you to take a break. Listen to it.

  9. YOUR TASK · 1/8

    Your final work starts here

    An interactive piece about speculative digital futures, on itch.io by week 50. Today's powers can build it. Final quest →

  10. YOUR TASK · 2/8

    Your variable, your story

    What should your place remember? keysFound, roomsSeen, trust, or choice (1 = left, 2 = right).

  11. YOUR TASK · 3/8

    Room 2 can be anything

    Not only another map: a memory, a closer look, a locked door, an ending.

  12. YOUR TASK · 4/8

    Small and working

    One room, one variable, one rule that works beats a big world that does not.

  13. YOUR TASK · 5/8

    Your own project counts

    Not using the map? Add the same three things: a variable, a rule that waits for it, a second layout.

  14. YOUR TASK · 6/8

    A screenshot that shows it

    Take it in Preview, at the moment something changes. Add one of the event sheet if you like.

  15. YOUR TASK · 7/8

    The tester rule

    Say nothing. Watch their hands. Write down one thing you did not expect.

  16. YOUR TASK · 8/8

    One sentence

    The visitor ___. It remembers ___. It is closest to ___ (genre). See the Genre explorer.

FINAL GATE · OBLIGATORY TASK 5 · 10 MIN

Light all seven seals

YOUR PROJECT · 4 LINES

Today’s powers in your project

Read the task text on Mitt UiB too. Not all seals lit? Post what you have and keep the .c3p.

SIDE QUESTS · OPTIONAL

Done early? Pick one.

5-10 minGate EngineWire an event sheet in the browser. Open the gate.Play

TECHNIQUE 04 / CONDITIONS AND ACTIONS

Gate Engine

Every game is a machine made of rules. In Construct, a rule is an event: a condition, and an action that runs only when the condition is true. Test a rule, wire an event sheet, then design a rule for your own project.

GATE ENGINE / EVENT SHEET

POWER 0%

  1. The rule≈ 3 minSee the condition fail and pass.
  2. Event sheet≈ 5 minWire two events, three actions, open the gate.
  3. Your rule≈ 3 minDesign a rule for your own game.

STAGE 1 / THE RULE

When does the gate open?

Move the slider and change the rule. The gate only opens when the condition is true. Try to see it both locked and open.

System ▸ keys ≥ 3

Enable JavaScript to play this stage.

STAGE 2 / EVENT SHEET

Wire two events. Then press Run.

The player walks right past three keys to the gate. Build the event sheet so every key is counted and picked up, and the gate opens at three. Event 1 needs two actions. Try a wrong combination too: Construct does exactly what you told it, not what you meant.
Event sheet 1

Just like Construct: a condition on the left, one or more actions on the right. Click + Add action when one event should do two things.

1
Condition
Actions
2
Condition
Actions

Enable JavaScript to play this stage.

STAGE 3 / YOUR RULE

Design a rule for your own project.

Every game rule answers three questions: what does the player do, when is it enough, and what happens then?

EVENT 1 Player ▸ On collision with Star → System ▸ Add 1 to stars

EVENT 2 System ▸ stars ≥ 5 → Show message: The night bus arrives

Want to read more about rules? Jesper Juul’s Half-Real separates a game’s real rules from its fictional world. It is on the Construct workshop: make your scene respond.

15 minRoom RepairFix a broken exit in Alinta's movement template.Play

CONSTRUCT 2 / ROOM REPAIR WORKSHOP

Get out. Find your way back.

North has working exits. The other rooms need your help. Repair one route in the real Construct editor, then make it part of your story.

Get SceneSetUpHowToMakeMovementExample.c3p in MittUiB Files ↗

Then follow the template walkthrough →

Download and open SceneSetUpHowToMakeMovementExample.c3p using the guide above. Keep Construct beside this page. A room is a layout; an event sheet holds its rules.

NorthEastYOUR GOAL: OUT AND BACK

01 / EXPLORE

Find the broken route.

  1. In Construct's Project Bar, expand Layouts and double-click North.
  2. Choose Preview layout. Tap the right arrow to enter East.
  3. Look for a way back. Close Preview and open East in the editor.

Discovery: East's arrow is parked outside the room. A visitor cannot reach it there.

Where are Layouts and Preview?
Real Construct editor with Project Bar at right and toolbar at top.
Real manual screenshot of a blank project. Marker 7 is the Project Bar. Your room appears in the middle. Construct source.

Expand Layouts in the Project Bar. Use the Preview layout option for the room you are editing, rather than starting the project's first layout.

Run it, then return to editing

Actual Construct toolbar with Menu, Save and triangular Preview control.
The triangle is Preview. Use its menu to preview the layout you are editing. Test the response, close Preview, then save an editable .c3p copy through Menu. Real screenshot from Construct documentation. Select the image to enlarge it.

02 / REPAIR

Give East an exit.

  1. In East, drag its arrow inside the room, where the visitor can see and tap it.
  2. Click empty space in the layout. Read the Event sheet property and open that sheet from the Project Bar.
  3. Find the tap rule for this arrow. If there is none, choose Add event > Touch > On tap object and select its object type.
  4. On that row, add or edit System > Go to layout. Choose North as the destination.

Try it: Preview East. Tap the arrow. You should arrive in North.

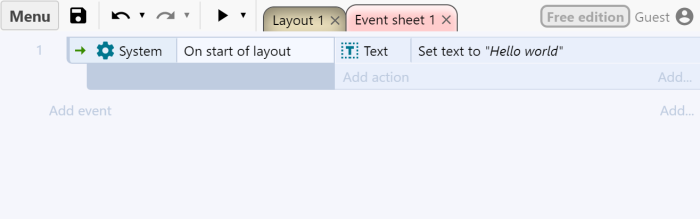
Read an event row in the real editor
Actual Construct event row: condition on the left, action on the right and Add action on the same row.
Real manual example, using System / On start of layout and Text / Set text. Your route uses Touch / On tap object and System / Go to layout. Construct source.

When this arrow is tapped → go to North. The condition is on the left. The action is on the right.

If the sheet is shared with North, do not change North's working rule. Use a separate arrow object type for East, or scope the new rule to East. Ask Ingrid to check the rule with you if both arrows currently use the same object type.

Choose who listens

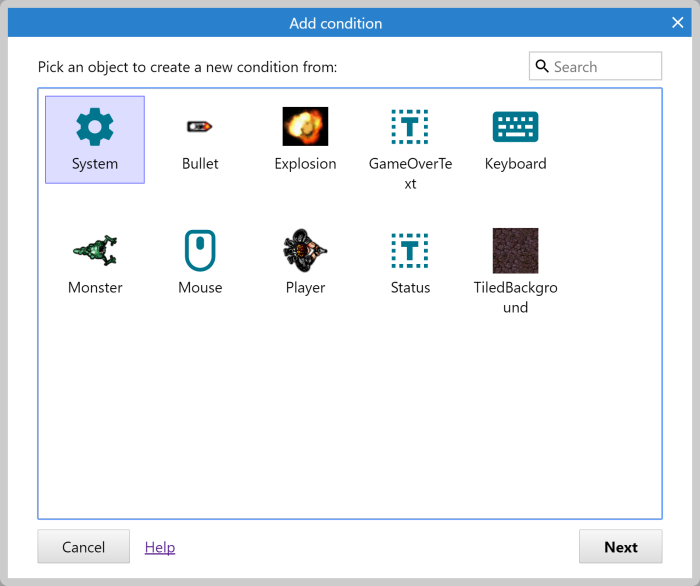
Actual Add condition dialog showing object choices, Search at top right and Next at bottom.
Add event opens an object picker. Search for Touch in your project, choose it, then choose On tap object. The screenshot is from another project, so its object list differs from yours. Real screenshot from Construct documentation. Select the image to enlarge it.

Add the response on the same row

Real Construct event sheet with Add event below and Add action on the existing row.
Use Add action to the right of your tap condition. Choose the object that should change, then its action and parameters. This screenshot shows a start-of-layout text example, not your tap rule. Real screenshot from Construct documentation. Select the image to enlarge it.

03 / PLAYTEST

Make the round trip.

  1. Preview North. Go to East, return to North, then go out again.
  2. Let a partner try without directions. Can they find both exits?
  3. Move an arrow or add a short Text label if the route is unclear. Test again.
  4. Save a .c3p copy. Use this room connection in your own project.

Working result: a visitor can travel North → East → North without getting stuck.

Another repair? South and West

Repeat the same process for one more room. Decide its destination before creating the action. Test every new connection in both directions.

A room can be a place, a memory or a mood. Choose what the journey means in your project.

any timeYour own projectMilestones and a note for your own idea.Play

YOUR IDEA / YOUR DECISION

What does your project remember after a choice?

Continue the Construct project you began last time.

EXPERIMENT 04Ready when you are

YOUR WORKBENCH

Make rules and rooms work

Continue the Construct project you began last time.

What does your project remember after a choice?

Get SceneSetUpHowToMakeMovementExample.c3p in MittUiB Files ↗

Then follow the template walkthrough →

Already working on something? Apply these steps to your own project. No AI required.

Your experiment checklist

Try these practical steps in your project. Check them when you have tested the result.

Experiment 4 milestones
0 / 3 milestones

Enable JavaScript to save a personal checklist on this device. The guides and schedule work without it.

Experiment not behaving? Open the help drawer.

Start small: describe what you expected, then what actually happened. Change one thing and try again.

Ask for help: “Can we look at this together?” Nobody is expected to know everything.

Need a pause?Take it. Your progress stays here when storage is available. Scheduled breaks: 09:00-09:10 and 09:40-09:45 (morning), or 15:00-15:10 and 15:40-15:45 (afternoon).

03WHEN YOU NEED IT

⏱ Whenever you need it

Examples and guides

Step-by-step guides and official screenshots. Open it when you need it.

Open the Construct guides
Next level: save & post →

LAST STOP / LAB 04

Save it. Post it. Bring it back.

  1. Save: Menu › Project › Save as › Download a copy. Name it yourname-lab4.c3p.
  2. Post: your screenshot under Discussions › Obligatory Task 5.
  3. Bring it back: the same .c3p next Friday. Lab 5 tests it on another person.
Return to the lab map ↑

Confirm your saved work below, then launch your finish screen.

Before you mark this quest complete
Save your work

What you can take from this lab

Leave with: your saved Construct project, one tested rule and a working route between rooms.

Connect to the course: a condition makes a consequence possible. A layout and its navigation shape how a story can be explored.

LAB 05 / FRIDAY 30 OCTOBER 2026

Project lab: build, browse, share

Work on your project, explore the library and help each other. Choose what you need.

Today · 14:15-15:30 · 75 minutes · no scheduled breaks

DIKULT105 / IDEAS, CODE & RESEARCH

Alan Turing's Library Lab.

Bring your project. Try a machine, find a source or ask someone to test your work.

Choose my route →

14:15–15:30Friday 30 October

Make things togetherProject work + optional library visit

A moment to rechargeNo scheduled breaks. Settle in.

A.T.LIBRARY STORIES / GAMES / ART / CODESOUND / DATA / PEOPLE / POWER
Play with the room

One useful next step is plenty. Choose a route below and take your time.

YOUR PROJECT / YOUR ROUTE

Where would you like to work?

Stay in the lab, visit the library, or do a little of both. Choose one route to see your next steps.

Make one small thing work.

Stay in our usual lab room. Open your project, choose a change and help each other try it. Bring the unfinished version.

  1. Open the work you already have.
  2. Build or repair one manageable part.
  3. Let a neighbour try it, then save.
Open my Friday workbench →

Take something you made into the library.

You can create first and find research afterwards. Start with one scene, sound, screen or interaction, then investigate what it does and what it might mean.

  1. Bring one part of your creation, or an interest to explore.
  2. Notice something, then find a useful book or article.
  3. Bring an idea back to your work and keep its reference.
Enter library lab mode →Help me find a physical book

Let an idea travel between the two.

Build a little, find something to read, then use it to see your project differently. You choose how to split the session.

  1. Choose a question from your project.
  2. Find a source that helps you investigate it.
  3. Try one change or question one design choice.
Open the project + research route →Find research words for my idea

All three routes are open. The library visit is optional.

THE FRIDAY COMMON ROOM

Make, test, share.

Bring your task, pull up a chair and help each other out. Stay with your own work or try a tiny side quest. Nothing here adds to the assignment.

OPTIONAL SIDE QUEST / LUCKY DIP

Swap the mouse.

Let a neighbour try one part of your work. Watch what they do first, then ask what felt clear or confusing.

Keep it small. Skip it, swap it or carry on with your own task.

Today's loose plan · 14:15-15:30 · no scheduled breaks
  1. 14:15-14:200-5 min

    Settle in

    Open your task, find a seat and say hello.

    Details & help

    A relaxed Friday together: project work, an optional library visit and time to recharge. We finish at 15:30.

  2. 14:20-15:255-70 min

    Make, browse and help each other

    Work on your tasks together, visit the library, or move between both.

    Details & help

    Ask Ingrid or a neighbour for help, try each other's work and take a breather along the way. No scheduled breaks today. Allow walking time if you go to the library.

  3. 15:25-15:3070-75 min

    Save before 15:30

    Keep your files and any source details you want to use again.

    Details & help

    Follow the current task instructions on Mitt UiB. Save what you worked on before we finish at 15:30.

Step 1 of 3 · Check in

Open your project, then step into today’s experiment.

Enter the project laboratory →

01PRACTICE

Choose: project work, library or both

These are three ways to use the session. You can stay with one or switch between them.

TURING'S LIBRARY / THREE WAYS TO SPEND FRIDAY

Pick a room. Make yourself at home.

Stay in the lab and work on your project, explore the library, or combine the two. Choose what helps you today. The library visit is optional.

Stay in the lab

Open your latest version and choose one manageable change. Work alongside each other, ask for help and let a neighbour try what you are making.

Your focus: an interaction, a scene, an interface, sound or a problem you want to solve. You can spend the whole session on your project.

Open the practical guides

Explore the library

Find your way around, search Oria and locate a book that could help with your interests. Look at nearby books too: another subject may give you a useful angle.

Open the book: use its contents or index to find a relevant passage. Keep the source details and the page you used.

From a search result to the shelf

Combine both

Work on your project, take a question to the library and use what you find to try a change or question a design choice. Switch between making and researching when it helps.

For example: build a room, read about how game interfaces guide players, then try a clearer signal in your scene.

Cite the source you actually read
First library visit? Find the book, step by step.
  1. Search UiB's Oria. Try a title, author or two topic words. Select a physical book record rather than an e-book if you want to find it on a shelf.
  2. Check the copy. Open “Get It” / “Finn og bestill”. Check the library, availability and full shelf location. Keep those details on your phone.
  3. Find the shelf. Follow the library's signs and compare the complete shelf mark with the book's spine. Ask staff when you cannot find it. Closed-storage items need requesting.
  4. Find the useful part. Check the contents, index and relevant pages. Compare the author's argument with what you are making.
  5. Keep the reference. Save author, title, year, edition and the page you used. For an article, keep its journal details and DOI when available.
  6. Borrow if useful. Bring your student card or student ID app. Use the self-service machine or ask at the desk.

Open UiB's Oria entry and access help ↗ · UiB's guide to finding and borrowing books ↗

If you go to the library: save any open project files before leaving. Allow time for the walk.

You can also research from the lab using an e-book or article. Google Scholar, Sikt's NVA and article-search help are available here. If access is blocked, keep the exact record and ask for help. UiB's Oria page explains access to licensed resources.

Help me find research words · Browse the starting book collection · Continue with Lab 6: future lab →

02REQUIRED

Your chosen next step

YOUR IDEA / YOUR DECISION

Choose what helps you today.

Continue your project, explore research or mix both. Help each other along the way.

  1. Choose a goal.
  2. Try it through making, reading or both.
  3. Keep what helps you continue.
EXPERIMENT 05Ready when you are

YOUR WORKBENCH

Move your work forward.

Build something, investigate a question or use research to explore a design choice. Choose what is useful for you.

What did you try or discover, and what would you like to do next?

Return to the project + library route

Already working on something? Apply these steps to your own project. No AI required.

Your experiment checklist

Try these practical steps in your project. Check them when you have tested the result.

Experiment 5 milestones
0 / 3 milestones

Enable JavaScript to save a personal checklist on this device. The guides and schedule work without it.

Experiment not behaving? Open the help drawer.

Start small: describe what you expected, then what actually happened. Change one thing and try again.

Ask for help: “Can we look at this together?” Nobody is expected to know everything.

Need a pause?Take it. Your progress stays here when storage is available. Scheduled breaks: 09:00-09:10 and 09:40-09:45 (morning), or 15:00-15:10 and 15:40-15:45 (afternoon).

03WHEN YOU NEED IT

⏱ Whenever you need it

Examples and guides

Step-by-step guides and official screenshots. Open it when you need it.

Open practical guides and official screenshots
Ready to share? Export and publish

LAB 5 / EXPORT → UPLOAD → TEST

Make a link someone can play.

Save your editable project, export its web files and choose itch.io or GitHub Pages. The guide starts with account creation and takes you through upload, screenshots and testing the published URL.

Open the step-by-step publishing guide

Your .c3p is the editable source. The web export is the playable version.

Optional: practise giving useful feedback

TECHNIQUE 05 / TESTING AND REVISION

Test Lab

You know how your project works. Nobody else does. The fastest way to see your work clearly is to watch someone else try it, and to say nothing while they do.

TEST LAB / USER TESTING

POWER 0%

  1. Watch≈ 3 minWatch a tester try the page.
  2. Sort≈ 4 minFind the feedback you can act on.
  3. Fix≈ 5 minRepair all three problems.
  4. Retest≈ 3 minWatch the tester again.
  5. Your test≈ 5 minPlan a test for your own project.

STAGE 1 / WATCH

The task: “Start the game.” Watch, and do not help.

NIGHT BUS

A story that waits for you.

start

TIME TO START: 0 s

Press Play the test.

STAGE 2 / SORT

Which feedback can you actually act on?

Useful feedback describes what someone did and what they expected. Sort each comment.

  • “It looks good.”

  • “I clicked the title because I thought it would start.”

  • “I didn’t see the start link. It was too pale.”

  • “Nice colours!”

  • “I wasn’t sure what the ☰ icon would do.”

  • “Maybe make it better?”

Sort all six, then check.

STAGE 3 / FIX

Repair what the tester struggled with.

The big title
The pale “start” link
The ☰ icon

Choose a revision for each problem. The page above changes as you choose.

STAGE 4 / RETEST

Same task. Same tester. Did your changes work?

Fix all three problems first, then retest.

STAGE 5 / YOUR TEST

Plan a five-minute test of your own project.

Fill in the task to build your test card.

Next level: save & reflect →

TURING’S LAB / LAB 5 MACHINE

Pointing machine

Watch how a person finds a control. Connect the observation to your user test and retest.

Enter this machine →

Optional experiment, 3-5 minutes within project time. All machines are open.

LAST STOP / LAB 05

Keep what you worked on.

  1. Save what you worked on. Your project files, research details or both.
  2. Choose your next step. What would help you continue next time?

Your experiment checklist and notes are saved in this browser when storage is available.

Next lab: future lab, 6 November →

Confirm your saved work below, then launch your finish screen.

Before you mark this quest complete
Save your work

What you can take from this lab

Leave with: Visible, saved progress on your own project, using today’s technique where relevant; the starter exercise is available for anyone who needs it.

Connect to the course: Audience, iteration and critical reflection: distinguish what you intended, what a tester encountered, and what you changed in response.

LAB 06 / FRIDAY 6 NOVEMBER 2026

Future lab: the lab is yours

Try eight small experiments, then build the future you want someone to experience.

Morning · 08:15-10:00 · 105 minutes

Today's timetable · two breaks: 09:00-09:10 and 09:40-09:45 (morning), 15:00-15:10 and 15:40-15:45 (afternoon)
  1. 08:15-08:200-5 min

    Arrive: open your project

    Open your project, or start a new one.

    Details & help

    Do: Open your project, or start a new one. Bring last week’s file if you have one.

  2. 08:20-08:305-15 min

    Together: the labs and the final assignment

    Connect earlier skills to the work, text, video and playable link.

    Details & help

    Review the final requirements and one working interaction together. Bring a question about your own project.

  3. 08:30-09:0015-45 min

    Open the machines

    Try a rule, a reveal or a different way to show an action.

    Details & help

    Choose the stations that interest you. Keep one technique or question to use in your project. Completing every station is optional.

  4. 09:00-09:1045-55 min

    Break: step away

    Save your project first. Then take a real break.

    Details & help

    Do: Save your project first. Then take a real break. Stretch, get water or leave the screen.

  5. 09:10-09:4055-85 min

    Build and test your next version

    Continue your change and check the result.

    Details & help

    Use the existing project notebook for your observation. If required obligatory work is missing, check its official task and ask for help.

  6. 09:40-09:4585-90 min

    Short break: reset

    Save and take a real break.

    Details & help

    Do: Save and take a real break. Stretch, get water or leave the screen.

  7. 09:45-09:5590-100 min

    Show a neighbour

    Let one person try it for two minutes.

    Details & help

    Do: Let one person try it for two minutes. Note one thing they did that surprised you.

  8. 09:55-10:00100-105 min

    Save and choose your next step

    Save the tested version, one observation and your next step.

    Details & help

    Keep the editable project files separately from browser progress. Bring the version and your question to the feedback clinic.

Need to check your obligatory tasks?

Check your task status and the official requirements on Mitt UiB. Ask Ingrid or the course coordinator if something is missing. Lab stars are your personal record, not formal approval.

Open Mitt UiB ↗

Step 1 of 3 · Check in

Open your project, then step into today’s experiment.

Enter the project laboratory →

01PRACTICE

Four checks. One useful fix.

Try a short mission, then take it into your project.

6 NOV / FINAL ASSIGNMENT PRACTICE

Put your project through the lab.

Four small tests. Then fix one thing in your own work.

0 / 4practice stations tried
01020304

Practice only. These checks are not grades or official submission approval.

01A future with a ruleChange who gets the water.Try

CITY / 2040

Three homes. Three units of water.

Choose a rule. Compare both.

Your project: what does one rule say about your future?

Need help?

The numbers are invented for this exercise. The rule changes who benefits. In your own work, try changing access, waiting, memory or ownership. Keep one consequence the visitor can notice.

Future-thinking guide →
02An action that makes senseTry it. Change the label. Try again.Try

THE LAST ARCHIVE / INTERFACE TEST

The room holds one memory.

What do you expect this button to do?

Your project: ask a neighbour to try one action without your explanation.

Need help?

Watch what they do first. Ask what they expected, then compare it with what happened. Fix one label, response or return route. Test it again.

Connect interaction and analysis →
03A source you can useWhich note gives you evidence?Try
Choose the useful research note

A reference needs more than a title.

Your project: keep one source, one passage and one connection to a real design choice.

Need help?

Find the original source and read the passage in context. Record the author, year and page or other locator. Keep the source's claim separate from your interpretation.

Chicago author-date desk →
04A link a stranger can openRepair the delivery package.Try

DELIVERY BAY / PRACTICE PACKAGE

project/
  index.html
  assets/
Package settings

Find both faults, then test.

Your project: open both your work and video links while signed out.

Need help?

A source project is not a browser export. For Construct, export Web (HTML5). Keep the exported index.html and its asset folders together. A passing practice test does not check your real URL.

Publishing guide →

Start anywhere. Every station stays open.

Back to my project →

ONE USEFUL FIX

Stuck on something?

Pick the part you are working on. Click again for another tip.

Open the guides →
The final assignment in four lines
  • Work: a creative interactive piece about speculative digital futures.
  • Text: 2000 words ±10%, analysing theme, genre and process.
  • Links: label the work and video walkthrough clearly.
  • Submit: check the current brief, eligibility and deadline in Mitt UiB and Inspera.

Follow the course's AI rules. These exercises do not write your assessment.

AI permissions · Official brief and full guide →
Explore the eight practice machines

FUTURE LAB / 6 NOVEMBER

Your next
experiment.

Make a room, send a memory, open a locked door. Eight machines bring the course together. Try what interests you, then use one discovery in your own project.

PATTERN / ADA
Input: 2 + 3
RULE / TURING
[0] 0 0 0

DIGITAL GENRES / TRY A FORM

What could your work become?

Choose a form, then operate the miniature. You can mix forms and keep your own subject.

A composition you can change.

ART / FORM + MOVEMENT

What changes when the composition moves?

Rotate it or change its palette. Compare both versions.

Try the Light room for scale and spacing.

Try the related machine →

Fictional miniatures for practice. These examples are not a final-assignment template.

EXPERIMENT SELECTOR / 8 OPEN STATIONS0 / 8 stations tried

Pick what interests you. There is no timer and no required order.

01 / HTML & CSS / LAB 1

Change the first impression.

Keep the words. Change the space around them. Can you make this first encounter easier to read?

  1. Text tuned
  2. Space tuned
A LIBRARY OF MEMORIES
Someone left
a memory here.

Will you listen, or leave one of your own?

Enter the library

Tune both controls. Notice what becomes easier to read.

Need a hint?

Move both sliders. Compare the roomy version with the compact one; keep the combination you would use.

Take it into your work: a visual choice changes an experience. Once it works, give it a reusable CSS class instead of rebuilding it on every page.

CSS and shared styles →

02 / JAVASCRIPT / LAB 2

What does the second click do?

A click can change a sentence. A second click tells you whether the system remembers.

  1. Transmitted
  2. Returned

No message on the screen. The channel is closed.

transmitting = false

Switch it on, then bring the room back.

Need a hint?

Transmit the memory, then close it. The second click should reverse the same state.

New habit: test the first click, second click and reload. Decide deliberately what resets and what persists.

Find an element → listen → change it →

03 / CONSTRUCT 1 / LAB 3

Find the hidden note.

Explore the archive. Find the hidden thought, then visit somewhere else. Position can carry a story.

  1. Hidden thought
  2. Another place

The archive is waiting. Choose a place.

Need a hint?

Open the bookshelf, then visit another part of the archive. A hidden object needs a route to discovery.

New habit: name objects for their job. In Construct, check the layout’s event sheet and test the exact object that should receive the tap.

Return to Alinta’s mapping template →

04 / CONSTRUCT 2 / LAB 4

Test both sides of a rule.

Try it while you have two keys. Then change the state and try again. Which condition lets you through?

  1. Locked route
  2. Door opened

LOCKED

keys = 2

IF keys ≥ 3 → open the door

Two keys. A rule. Try the door before changing anything.

Need a hint?

Try the door with two keys before adding a third. Test again after the value changes.

New habit: display a variable while debugging. Check where it is initialised, what changes it and whether entering a room resets it.

Rules, rooms and the original Gate Engine →

05 / PROJECT + LIBRARY / LAB 5

Choose a useful research question.

Choose two perspectives. Which questions help you understand your own work?

  1. First perspective
  2. Another perspective
Choose a scholar. Compare two questions, then read a source that fits your project.
Open the course library →
Need a hint?

Try two different scholars. Read the relevant passage before using it. These are suggested questions, not quotations or required readings.

New habit: keep author, year, title, page and your reason for using the source together. Cite the passage you actually read, then connect it to a particular decision in your work.

Find a book for your project →

06 / SPECULATIVE DIGITAL FUTURES / TODAY

Change who can enter.

Imagine a future library of shared memories. Change the access rule. Then switch visitor. The same interface can produce a very different future.

  1. Exclusion tested
  2. Entry restored
The library admits…
You arrive as…

The memory opens. Everyone can enter.

A fictional model, not a real library policy. Try excluding someone, then change the rule so they can enter.

Need a hint?

Choose Contributors while arriving as a visitor. Then arrive as a contributor, or change the rule to Everyone.

Your turn: what does your interaction make possible, and for whom? Sketch before → action → after. You can keep your own topic and your existing project.

Ways to think about futures →

07 / FEEDBACK CLINIC / 13 NOVEMBER

Make the first action clearer.

Try the control. Then change its label and try again. The action stays the same; what the interface communicates changes.

  1. First version
  2. Revised version
A STORY THAT WAITS FOR YOU
Night bus

You are the last person at the stop.

Version 1: an arrow

Try the arrow, change the label, then try the new version.

Need a hint?

Try the arrow first. Move the label to Start the story, then try it again. Compare what each label promises.

New habit: watch a real person before explaining. Record what they did and expected; change one thing and repeat the same task. This rehearsal does not replace that test.

Bring a question to the feedback clinic →

08 / EXPORT + PUBLISH / 20 NOVEMBER

Check the export before publishing.

Pack a tiny web project. Choose its three files, remove the extra outer folder and test the package.

  1. Entry included
  2. Assets included
  3. Package tested
Files to include
project/
  (empty)

A rehearsal only. No files are uploaded.

Need a hint?

Include all three files, remove the extra outer folder, then test. The host needs index.html at the upload root.

New habit: keep editable source and web export separately. Publish early, test the exact work and video links while signed out, then update and retest after changes.

Export and publish for real →

The eight experiments and their explanations are below. JavaScript enables their controls and the station selector.

Practice progress is saved on this device when available. It is separate from lab stars and assessment approval.

02REQUIRED

Take one discovery into your work

Use your current project or begin with one place, one action and one response.

EXPERIMENT 06Ready when you are

YOUR WORKBENCH

What will someone discover in your work?

Choose a technique from the machines, or keep the idea you arrived with. Make one interaction express your future. Save a copy before changing it.

Try the four assignment checks →

Starting fresh? Sketch before → action → after, then build it with a tool you know. A small working encounter is enough to begin.

Today’s three milestones

Experiment 6 milestones
0 / 3 milestones

Enable JavaScript to save a personal checklist on this device. The guides and schedule work without it.

Working towards the final assignment? Your interactive work, analysis, playable link and walkthrough belong together. Check the complete submission route and AI permissions →

03WHEN YOU NEED IT

⏱ Whenever you need it

Keep the help you need

The full course recap, new practical tips and final-assignment requirements are here when useful.

Open the full recap, tips and assignment route

THE WHOLE COURSE / KEEP THIS BESIDE YOUR PROJECT

What you can take from every lab

You already have several ways to make an interactive work. Find the part your project needs next. Open that lab below for a reminder, a new tip and a test you can use today. You do not need to put every technique into your final work.

Labs 1–5: skills so far. Lab 6: today. Labs 7–8: the next two Fridays. All eight stay open.

01HTML & CSS2 October · Give your work a place

What we practised: turning a place into a page. HTML gives the content structure and meaning; CSS controls its presentation and layout.

Take it into the assignment: make the first encounter readable. What is this place, what can someone do here, and which detail makes it yours?

New tip: once a button or panel works visually, give that pattern a reusable class. Keep shared rules in one stylesheet instead of pasting a different version into every page. Use headings for structure, a button for an action and a link for a destination.

Try it: resize the window, use Tab to reach the first control, then zoom to 200%. Can you still read and use it without losing content?

Setup and first page · CSS & colour studio · Reusable CSS

02JavaScript9 October · Make a choice change something

What we practised: finding an HTML element, listening for a click and changing a sentence. The second-click challenge introduced state: what the page remembers right now.

Take it into the assignment: connect an action to a consequence that expresses your future. A visitor might reveal a memory, refuse a request or change who receives a resource.

New tip: write the starting state, action and resulting state on paper before adding more code. Decide what a second click, restart or return visit should do. Test those cases as deliberately as the first click.

Try it: click twice, reload, then repeat. If the result surprises you, inspect the state and the first Console error before changing the design.

First JavaScript interaction · Events, state and debugging

Lab 2 also included separate AI-assisted practice. Assessment permissions are explained below; practice permission does not carry over automatically.

03Construct 116 October · Let a place reveal a secret

What we practised: mapping campus places, adding text and paths, and revealing hidden text with a tap. Alinta’s mapping template gives you an editable starting point.

Take it into the assignment: use position, exploration and discovery as part of the meaning. A message behind a door feels different from one visible from the start.

New tip: name objects by their job, such as MemoryNote or ExitDoor. Check that the layout uses the event sheet you are editing. An object in the Project Bar also needs an instance in the scene when the interaction requires it.

Try it: use Preview layout on the scene you changed. Tap the intended object, then a nearby empty area. Does only the intended action reveal the message?

Mapping template walkthrough · Construct toolkit · Alinta’s templates in Mitt UiB

04Construct 223 October · Give rooms rules and memory

What we practised: movement, conditions, variables and room transitions. The Gate Engine lets you investigate why a door opens and what a system remembers.

Take it into the assignment: make a rule say something. What must the visitor give up to enter? Does the next room remember their decision?

New tip: show a variable temporarily as visible text while testing. You can see whether a tap changes it once or an ongoing condition changes it every frame. Check where you initialise or reset it; a reset on every layout start can erase a choice you meant to keep.

Try it: make the choice, leave the room and return. Test the locked and unlocked routes. Write down the expected value at each point.

Movement template walkthrough · Rules and rooms · How Construct events work

05Your project + the library30 October · Find a useful next step

What we practised: choosing a manageable project goal or research question, making progress and keeping what helps. The library route connected making with sources and examples.

Take it into the assignment: use research to understand a choice, a genre or a future. A reference should help you explain something specific in your work.

New tip: search with your form plus your question: for example, “interactive fiction player agency” or “sound art environmental listening”. Keep author, year, title, page and the reason the source matters together. Separate a quotation from your own paraphrase in your notes.

Try it: choose one source you have actually read. Point to one moment in your work that it helps you analyse. If you cannot make the connection, revise the question or find a more relevant source.

Research finder · Article searches · Chicago author-date

06Future lab6 November · Today: bring the pieces together

Today’s task: use an earlier skill to improve your own interactive work about speculative digital futures. Keep your current project if it can address the theme.

New tip: sketch one encounter as “before → action → after”. Then ask what that change suggests about the future and who experiences it differently. A small, deliberate interaction gives you something concrete to build, test and analyse.

If you are starting: choose one place, one visitor action and one response. Use a tool you know. A paper sketch can help you decide before you code.

If you already have a working project: find its weakest important moment. Improve its rule, clarity, sound, access or reliability before adding another feature.

Make today’s change · Future-thinking methods

07Feedback clinic13 November · Next: test the experience

Coming next: explain what you are making, for whom, what they should experience and which interaction matters most. Get feedback on concept and experience before polish.

Prepare now: ask someone to attempt one task without coaching. Record what they do and expect. “They clicked the title to begin” gives you more to work with than “they liked it”.

New tip: distinguish a failure of the interaction from a disagreement with your idea. A tester can understand an unsettling work and still feel unsettled. Decide whether their experience supports your intention before changing it.

Try it: keep one observation, make one revision and repeat the same task. Save a before-and-after screenshot and a sentence explaining why you changed it.

Feedback clinic · Game vocabulary and flow questions

08Ship it20 November · Then: publish and show it working

Coming next: export the playable work, test its hosted link and record a walkthrough. Keep the editable source as well as the published version.

New tip: publish an early test version before the final week. This finds missing files, path errors and browser restrictions while you still have time to fix them. Update it after changes and retest the same URL.

Try it: open the exact work and video links while signed out. Reach the important interaction and its consequence. A GitHub repository page, an editable .c3p and a local file path are different from a playable website.

Export and publish: itch.io or GitHub Pages · Walkthrough guide · Ship it lab

Choose one gap for today. You can improve a working project without rebuilding it. If you are stuck, bring your current version and say: “I expected this; this happened instead.” We can work from there.

FROM YOUR PROJECT TO THE HAND-IN

What the final assignment needs

This is a planning summary of the course’s final guide. The current brief in Mitt UiB → Files, course updates and Inspera govern the assessment. These practical suggestions add no new marking criteria.

  1. An interactive work about speculative digital futures

    Make an interactive artwork, artistic game, sound piece or a creative combination. Web design is allowed; a plain informational website is insufficient. Choose a form that serves your idea. Show what the visitor can do and how the result relates to your imagined future.

  2. Your own analytical text: 2000 words ±10%

    The allowed band is 1800–2200 words, in English or Norwegian. Analyse theme, genre and creative process. Use particular moments from the work, relevant sources and your own reasoning. Clearly label the interactive-work URL and video-walkthrough URL near the start.

    For process, keep a real decision, challenge or test and explain what changed and why. Use Chicago author-date consistently; check the official instructions for file format and how references or captions count. Text structure and word planning · Citation examples

  3. A playable link and a video walkthrough

    itch.io is recommended; GitHub Pages or another accessible public host is also allowed. Show the start, main interaction and its consequence in the video. Speaking is optional. Test both links without your login and make the text and video correspond to the submitted version.

    Link requirements · Record and share the walkthrough

  4. Eligibility and the actual submission

    All required obligatory work and the attendance requirement must be approved. Check your recorded results and ask the course coordinator about uncertainty; personal lab stars do not establish eligibility. Submit through Inspera in week 50. Check its exact deadline, required format and upload instructions before the day you plan to submit.

    Check recorded results · Eligibility guidance · Final submission checks

AI permissions: check before using a tool

The current guide says no AI in making the interactive work, unless you are specifically addressing AI as part of speculative digital futures. Alinta explains that permitted scope; ask her before using it if you are unsure. Do not let AI write the text. Light editing is permitted when you write in English. Lab 2’s AI-assisted practice is separate. Read the course’s AI rules.

New tips for the part you are working on

Open one drawer when it solves your current problem. The longer coding museum has demonstrations and more explanations.

VS Code: move faster and keep your work recoverable
  • Open the project folder. Use File → Open Folder so HTML, styles, scripts and assets belong to the same workspace. Preview the file you are actually editing.
  • Find a file or a command. Quick Open is Ctrl+P on Windows/Linux, Cmd+P on Mac. The Command Palette is Ctrl+Shift+P or Cmd+Shift+P. Search for “Format Document”, “Go to Line” or “Keyboard Shortcuts” instead of memorising every menu.
  • Search across the project. Ctrl+Shift+F / Cmd+Shift+F finds a class, filename or repeated sentence across files. Review each replacement; renaming a class in HTML without updating CSS can break its styling.
  • Use Problems and formatting. View → Problems collects reported errors; follow the file and line. Format Document makes nesting easier to inspect. It does not prove that your interaction works.
  • Keep useful snippets. Save a small pattern you understand, such as a labelled control or an event listener. Adapt names and purpose when reusing it. Shared visual rules belong in the stylesheet.
  • Save a recoverable version. Save before testing. Make a backup or a Git commit before a risky change; compare the changes before keeping them. Browser progress and a preview window do not replace project files.
  • If the editor is slow: close unrelated workspaces and large generated files. Disable unused extensions for this workspace and compare. Add extensions to solve a need rather than collecting several that do the same job.

Shortcuts can differ with your layout or custom bindings. VS Code tips · Editing and search · Managing extensions

HTML & CSS: keep your style, fix the actual cause
  • Give each file a job. HTML: content and meaningful elements. CSS: appearance and layout. JavaScript: behaviour and state. Check the stylesheet’s href and script’s src against the actual filenames.
  • Keep a small visual vocabulary. Choose your type, spacing, colours, borders and control states. Use CSS custom properties for repeated values and classes for repeated components. A specific scene can have a scoped variation while navigation stays familiar.
  • Inspect before overriding. In browser developer tools, select the element and inspect its matched and computed rules. A crossed-out declaration lost to another rule. Fix the relevant selector or source order instead of piling on !important.
  • Check paths on the hosted site. Use the correct filename case and preserve asset folders. A path beginning with / starts at the domain root; that may miss a GitHub project’s repository folder.
  • Read the page without the decoration. Are headings in a sensible order? Do controls have labels and focus states? Can someone understand what to do if a background image does not load?

MDN: cascade and conflicting styles · HTML help · CSS examples

JavaScript or Construct: find where the rule stops working
  1. Reproduce one failure. Write the steps, expected result and actual result. Save a working copy before investigating.
  2. For JavaScript: open the Console, reproduce the problem and read the first error with its file and line. Check spelling, element IDs and whether the script loaded. A null element often means the selector found nothing; inspect the matching HTML and when the script runs.
  3. For Construct: check the active layout’s event sheet, the condition and the object instances selected by that condition. An ordinary condition may be checked every tick; a trigger responds to a particular event. Watch the relevant variable while you test.
  4. Change one cause, then retest. Check the first action, repeated action, reset and return route. Remove temporary debug displays when they have served their purpose.

For help, show the smallest relevant code or event sheet, the exact error and what you have tried. MDN: troubleshooting JavaScript · Construct: events and object picking

Animation, sound and speed: test what the visitor receives
  • Animate a reason. Motion can show waiting, change or attention. Try the work with motion reduced or paused: the action and its result should remain understandable.
  • Measure a slow moment. Record that interaction in the browser’s Performance panel. Compare before and after one change. Avoid rewriting the whole project on the assumption that more code is the problem.
  • Check large assets first. Resize images to a useful display resolution, compress a delivery copy and keep originals separately. Avoid loading several large videos or audio tracks before they are needed.
  • Start sound through a deliberate interaction. Test it on the hosted version. Provide a mute or volume route, and captions or a transcript for speech. Do not make essential instructions depend only on hearing.
  • Keep the target device in the test. Check text, touch controls, loading and sound on the device your work is intended for. Explain any necessary device or control requirements.

Chrome Performance panel · Animation and reduced motion · Sound and media studio

Recognise generic output and make deliberate choices

“AI slop” is a useful criticism only when you can name what fails. A font or colour cannot establish authorship. Evaluate the work and its claims.

  • Replaceable content: could the introduction describe almost any project? Replace it with the actual place, material, action or question.
  • Decorations without a job: can you explain why the effect belongs here? Keep what contributes to the encounter and remove distractions.
  • Promises without behaviour: activate every button, follow every link and check the claimed feature. A convincing screenshot can conceal a broken interaction.
  • References without evidence: open the source and check the author, claim and passage. Do not cite a source you have not checked.
  • Code without understanding: explain the condition and effect in your own words. Simplify until you can predict the important behaviour and test it.

Your process notes should preserve your decisions and observations. Apply the assessment’s AI permissions above before using any assistant. More critical-judgement exercises

Publishing problems: blank page, wrong version or a download
  • Keep source and delivery separate. A Construct .c3p is editable source. Export Web (HTML5) for a browser version. For a hand-coded work, keep HTML, CSS, JavaScript and assets together.
  • itch.io: upload the web ZIP with index.html at its root, choose HTML and enable browser play. If visitors only receive a download, check those settings.
  • GitHub Pages: upload the extracted files and asset folders to the chosen publishing folder. Enable Pages for the intended branch and folder, then wait for a successful deployment. Use its website URL.
  • Missing assets: inspect the browser’s Network panel for failed requests. Compare filename case and folder paths. Upload the complete export rather than moving only index.html.
  • Old version: confirm the updated files reached the host and deployment finished. Reload the exact public URL, then test signed out. Saving in VS Code alone does not update the website.

Full publishing walkthrough · GitHub account and Pages guide · Final checks before submission

Next level: save & reflect →

Let a neighbour try it

Swap for two minutes each. Let them explore before you explain.

  1. Ask: “What could you do? What changed?”
  2. Compare their experience with your intention.
  3. Choose one thing to improve. A paper sketch or a specific blocker is useful if the code is not running yet.

LAST STOP / LAB 06

Save the version you tested

  1. Save your project files. Keep a copy somewhere you can find again.
  2. Keep one observation and one next step. Bring them to the feedback clinic on 13 November.

Your experiment checklist and notes are saved in this browser when storage is available.

Return to the lab map ↑

Confirm your saved work below, then launch your finish screen.

Before you mark this quest complete
Save your work

What you can take from this lab

Leave with: One useful project change, a test observation, saved files and a clear next step towards the final assignment.

Connect to the course: The theme of the final assessment: speculative digital futures, as something a visitor can do.

LAB 07 / FRIDAY 13 NOVEMBER 2026

Feedback clinic: what should they feel?

What are you actually trying to make someone experience?

Morning · 08:15-10:00 · 105 minutes

Today's timetable · two breaks: 09:00-09:10 and 09:40-09:45 (morning), 15:00-15:10 and 15:40-15:45 (afternoon)
  1. 08:15-08:200-5 min

    Arrive: open your project

    Open your project and your notes.

    Details & help

    Do: Open your project and your notes. Bring the version you have, finished or not.

  2. 08:20-08:305-15 min

    Together: the feedback order

    Concept first, polish last.

    Details & help

    Do: Concept first, polish last. Ingrid shows how to give feedback that helps.

  3. 08:30-09:0015-45 min

    Clinic, round 1

    Diagnose, then swap feedback with a partner.

    Details & help

    Do: Diagnose, then swap feedback with a partner. Fill in the four lines first. Then feedback in order.

  4. 09:00-09:1045-55 min

    Break: step away

    Save your project first. Then take a real break.

    Details & help

    Do: Save your project first. Then take a real break. Stretch, get water or leave the screen.

  5. 09:10-09:4055-85 min

    Clinic, round 2: fix

    Change the one thing that matters most.

    Details & help

    Do: Change the one thing that matters most. Or swap with a new partner.

  6. 09:40-09:4585-90 min

    Short break: reset

    Save and take a real break.

    Details & help

    Do: Save and take a real break. Stretch, get water or leave the screen.

  7. 09:45-09:5590-100 min

    Start your text

    Write the first 100 words of your process part.

    Details & help

    Do: Write the first 100 words of your process part. Use the Final quest text builder or your own document.

  8. 09:55-10:00100-105 min

    One next step

    Write what you change next week. Save.

    Details & help

    Do: Write what you change next week. Save. Bring the file next Friday.

Step 1 of 3 · Check in

Open your project, then step into today’s experiment.

Enter the project laboratory →

01PRACTICE

Practice: Feedback clinic

Diagnose first. Feedback in the right order. Write it down.

Feedback is material for your written text: the process part. Text builder →

Diagnose

DIAGNOSE · 10 MIN

Fill in four lines before anyone gives feedback:

I AM MAKING ___ FOR ___
I WANT THEM TO FEEL / NOTICE / UNDERSTAND / QUESTION ___
THE MOST IMPORTANT INTERACTION IS ___

Swap

SWAP · 20 MIN

Feedback in this order: concept, experience, form, scope, technical problem, and polish last.

Flow check →

Write it down

NOTE · 5 MIN

Every piece of feedback is process. It becomes part 4 of your text.

Start your text →

02REQUIRED

Your project

YOUR IDEA / YOUR DECISION

Choose what your project lets someone do.

Start with a place, feeling or question you care about.

  1. Choose one interaction.
  2. Build it yourself.
  3. Test it twice.
EXPERIMENT 07Ready when you are

YOUR WORKBENCH

Make it sharper

Use other eyes to find what matters most.

What is the one thing a stranger must not miss?

Start your text in the Final quest →

Working on your final project? Use these steps on it.

Your experiment checklist

Try these practical steps in your project. Check them when you have tested the result.

Experiment 7 milestones
0 / 3 milestones

Enable JavaScript to save a personal checklist on this device. The guides and schedule work without it.

Stuck? Open the help drawer.

Start small: describe what you expected, then what actually happened. Change one thing and try again.

Ask for help: “Can we look at this together?” Nobody is expected to know everything.

Need a pause?Take it. Your progress stays here when storage is available. Scheduled breaks: 09:00-09:10 and 09:40-09:45 (morning), or 15:00-15:10 and 15:40-15:45 (afternoon).

03WHEN YOU NEED IT

⏱ Whenever you need it

Examples and guides

Step-by-step guides and official screenshots. Open it when you need it.

Open the guides for today
Next level: save & reflect →

LAST STOP / LAB 07

Keep your work. Make a note.

  1. Save your project files. Keep a copy somewhere you can find again.

Your experiment checklist and notes are saved in this browser when storage is available.

Return to the lab map ↑

Confirm your saved work below, then launch your finish screen.

Before you mark this quest complete
Save your work

What you can take from this lab

Leave with: Four diagnosis lines, feedback in order and one change in your process notes.

Connect to the course: Part 4 of the written text: the process, and a challenge you solved.

LAB 08 / FRIDAY 20 NOVEMBER 2026

Ship it: a link and a video

Can a stranger open your work, and see it at its best?

Morning · 08:15-10:00 · 105 minutes

Today's timetable · two breaks: 09:00-09:10 and 09:40-09:45 (morning), 15:00-15:10 and 15:40-15:45 (afternoon)
  1. 08:15-08:200-5 min

    Arrive: open your project

    Open your project and your itch.io account.

    Details & help

    Do: Open your project and your itch.io account. No account yet? Make one now. A nickname is fine.

  2. 08:20-08:305-15 min

    Together: export and itch.io

    Watch one export and upload on the big screen.

    Details & help

    Do: Watch one export and upload on the big screen. Then do the same with your work.

  3. 08:30-09:0015-45 min

    Ship: export, upload, test

    Make the link work for a stranger.

    Details & help

    Do: Make the link work for a stranger. Private window, phone, then fix.

  4. 09:00-09:1045-55 min

    Break: step away

    Save your project first. Then take a real break.

    Details & help

    Do: Save your project first. Then take a real break. Stretch, get water or leave the screen.

  5. 09:10-09:4055-85 min

    Record the video walkthrough

    Show it working, at its best.

    Details & help

    Do: Show it working, at its best. Start, main interaction, the moment it changes.

  6. 09:40-09:4585-90 min

    Short break: reset

    Save and take a real break.

    Details & help

    Do: Save and take a real break. Stretch, get water or leave the screen.

  7. 09:45-09:5590-100 min

    Links into the text

    Paste both links into your text, clearly labelled.

    Details & help

    Do: Paste both links into your text, clearly labelled. Use the Final quest text builder or your own document.

  8. 09:55-10:00100-105 min

    One next step

    Weeks 48 and 49 have no classes. Write your plan for them.

    Details & help

    Do: Weeks 48 and 49 have no classes. Write your plan for them. Keep the link working. Do not move or rename it.

Step 1 of 3 · Check in

Open your project, then step into today’s experiment.

Enter the project laboratory →

01PRACTICE

Practice: Ship it

Export, test, record. Leave with a link and a video.

A broken link may fail. Test the exact link you paste. Final seals →

Export

EXPORT · 15 MIN

Web export. Upload to itch.io, playable in the browser, set to public.

Publish guide →

Test

TEST · 10 MIN

Open the exact link in a private window and on a phone. Fix what breaks.

Record

RECORD · 20 MIN

A video walkthrough: the start, the main interaction, the moment it changes. Your voice is optional.

Video guide → · Sound check →

02REQUIRED

Your project

YOUR IDEA / YOUR DECISION

Choose what your project lets someone do.

Start with a place, feeling or question you care about.

  1. Choose one interaction.
  2. Build it yourself.
  3. Test it twice.
EXPERIMENT 08Ready when you are

YOUR WORKBENCH

Ready for the examiner

The work, the link and the video, all reachable.

Does the link work for someone who is not you?

Run the final seals →

Working on your final project? Use these steps on it.

Your experiment checklist

Try these practical steps in your project. Check them when you have tested the result.

Experiment 8 milestones
0 / 3 milestones

Enable JavaScript to save a personal checklist on this device. The guides and schedule work without it.

Stuck? Open the help drawer.

Start small: describe what you expected, then what actually happened. Change one thing and try again.

Ask for help: “Can we look at this together?” Nobody is expected to know everything.

Need a pause?Take it. Your progress stays here when storage is available. Scheduled breaks: 09:00-09:10 and 09:40-09:45 (morning), or 15:00-15:10 and 15:40-15:45 (afternoon).

03WHEN YOU NEED IT

⏱ Whenever you need it

Examples and guides

Step-by-step guides and official screenshots. Open it when you need it.

Open the guides for today
Next level: save & reflect →

LAST STOP / LAB 08

Keep your work. Make a note.

  1. Save your project files. Keep a copy somewhere you can find again.

Your experiment checklist and notes are saved in this browser when storage is available.

Return to the lab map ↑

Confirm your saved work below, then launch your finish screen.

Before you mark this quest complete
Save your work

What you can take from this lab

Leave with: A public link that works for a stranger, and a video walkthrough.

Connect to the course: What to submit: the text with the URL, and a video that shows the work functioning.

Extra resources · CSS starter and your choices
HTML + CSS starter

LAB 1 / QUICK REFERENCE

The Lab 1 starter CSS.

For the full walkthrough with colour and contrast, open the CSS & colour studio in Lab 1.

Create style.css beside index.html. Put this line inside the HTML head:

<link rel="stylesheet" href="style.css">

Put this CSS in style.css. Save both files, open Live Preview and change one value at a time.

body {
  max-width: 44rem;
  margin: 3rem auto;
  padding: 0 1.25rem;
  font-family: system-ui, sans-serif;
  line-height: 1.65;
  color: #18242d;
  background: #f3f0e8;
}
summary { cursor: pointer; }
summary:focus-visible { outline: 3px solid #215a75; }

Download the working HTML + CSS starter ↓ · MDN's official CSS walkthrough ↗

YOUR WORK, YOUR CHOICES

You decide what you share.

Personal experience can be a starting point, but you never have to share anything private. Use ordinary observations, fictionalise details and keep what you want to yourself. Every core activity in the labs works without generative AI.